Canteen Operator guide contents
For canteen staff at the door or the serving counter. Usually used on a phone or tablet fixed in the canteen.
The screenshots show the app in Indonesian. In the app, open Profile & Account and choose EN to switch the language.
What you can do
- Scan an employee's QR card
- Verify with a face scan (Premium plan)
- Type the Employee ID when a card has a problem
- See the claim result, success or refused, with the reason
- Use kiosk mode in the Android app
Outside this role
- Change or delete a claim that is already recorded
- See reports, bills, or financial data
- Manage employees, menus, or settings
- Leave the Scan screen without the password (while lock mode is on)
- 1Get started: sign in and install
Sign in with the operator account, then install the app on the canteen phone or tablet. - 2Scanning employee cards
The main way: scan the QR card on the employee's phone. - 3Face scan and typing an ID
For when a card is left behind or the employee's phone has a problem. - 4When the internet is down
QR scans are still recorded and sent automatically once connected. - 5Kiosk mode (Android app)
Lock the phone so it only shows the Scan screen. - 6Frequently asked questions
Short answers to the most common problems.
Get started: sign in and install
Sign in with the operator account, then install the app on the canteen phone or tablet.
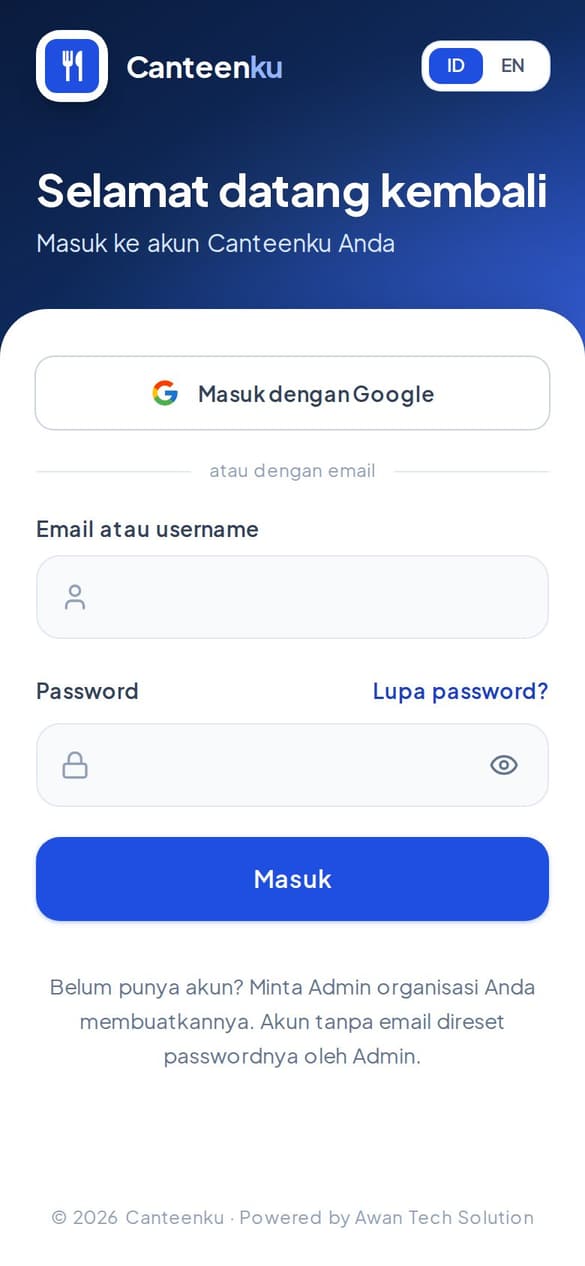
1Sign in to Canteenku
Your account is created by the admin or HR of your organisation. You do not need to register yourself.
- Open canteenku.cloud in Safari or Chrome, or open the Canteenku app if it is already installed.
- Enter the Email or username and Password your admin gave you, then tap Sign in.
- If your account uses a Google email, tap Sign in with Google.
- After signing in, you land on the home page for your role.
After you sign in with an operator account, the app opens the Scan screen straight away. You do not need to look for a menu.
Forgot your password? Tap Forgot password? on the sign-in page, enter your email, and follow the button in the email. Accounts without an email: ask your admin to reset the password.
After your first sign-in, change your password in Profile & Account so only you know it.
2Install it on your phone
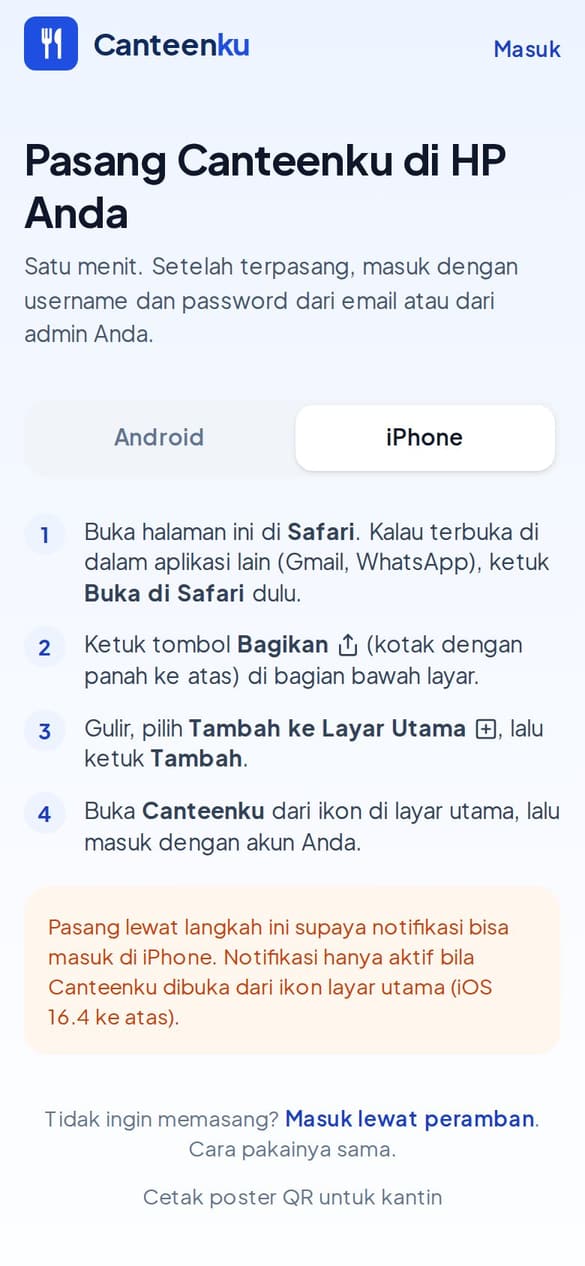
Canteenku works in a browser, but it is more convenient installed like an app. Choose your phone.
- Android: open canteenku.cloud/unduh, tap the download button, open the Canteenku.apk file from the notification or the Files app, allow install from this source if asked, then tap Install.
- iPhone: open canteenku.cloud in Safari, tap the Share button (a box with an arrow pointing up) at the bottom of the screen, choose Add to Home Screen, then tap Add.
- Open Canteenku from the icon on your home screen and sign in with your account.
On iPhone, notifications only work when Canteenku is opened from the icon on the home screen (iOS 16.4 or later), not from regular Safari.
Scanning employee cards
The main way: scan the QR card on the employee's phone.
1Scan a QR card
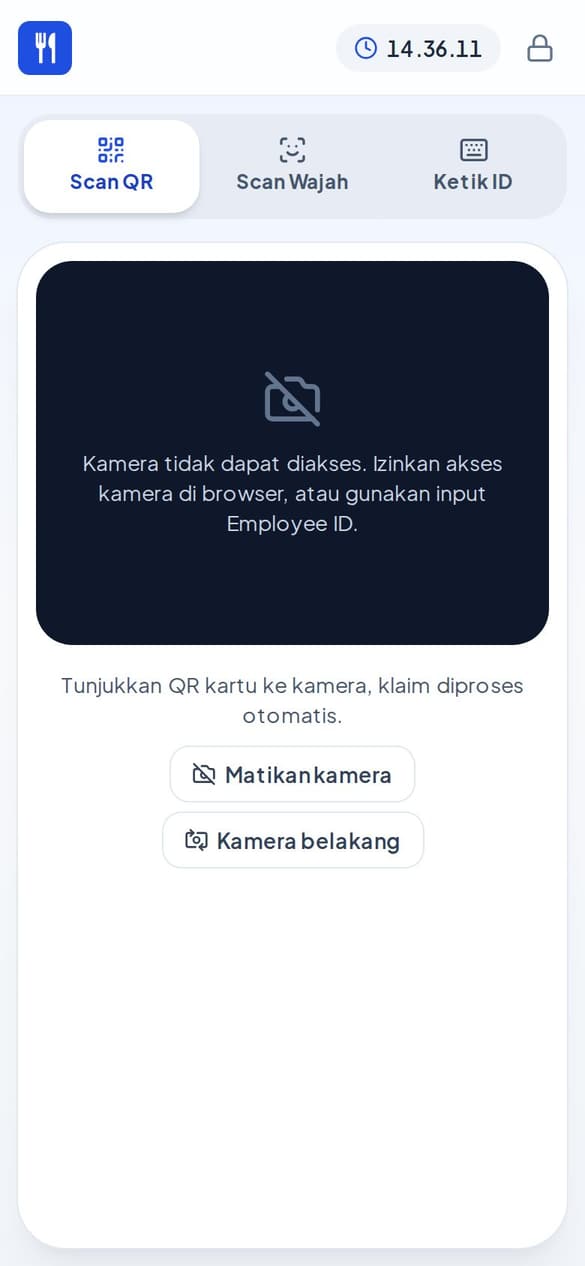
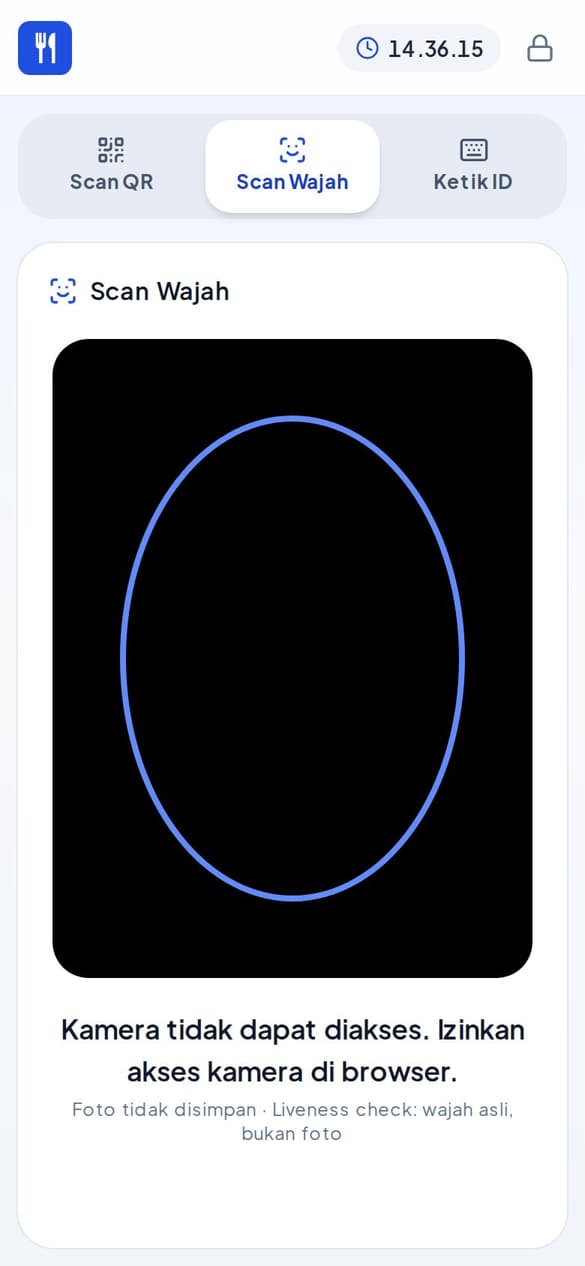
The Scan screen has three tabs at the top: Scan QR, Face Scan, and Type ID. The camera starts automatically on the Scan QR tab.
- Make sure the right canteen is selected (the Claim location field, if the organisation has more than one canteen).
- Ask the employee to open My Card on their phone, then point the QR code at the camera.
- The claim is processed automatically. The result appears large on screen: success or refused with the reason.
- The screen is ready for the next employee.
Allow camera access when the browser or app asks. If the camera does not show, tap Turn camera on.
Back camera / Front camera: tap the button to switch cameras if the phone is mounted in a particular position.
2Reading the claim result
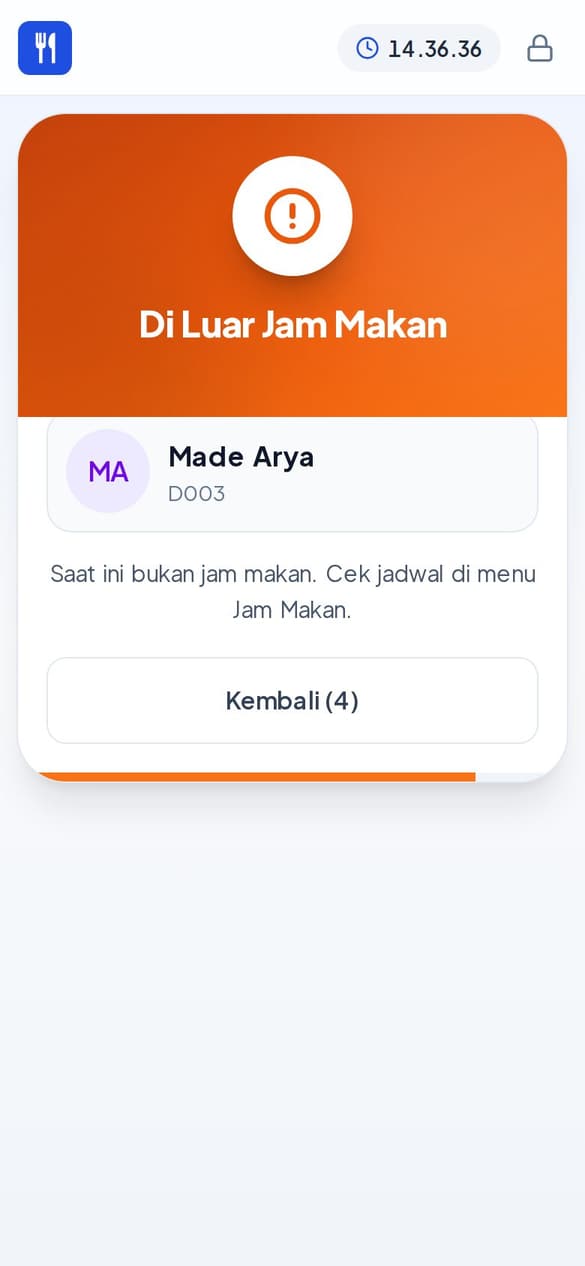
- Success: the screen shows the meal taken (for example Lunch or Dinner), the time, and the employee's name. The employee may eat.
- Allowance already used: the screen shows the time and place of the earlier claim under Previous Claim Details. Do not serve another meal.
- Outside meal times or a status of Off, Leave, or Inactive: there is no allowance. The screen explains why.
- Face Not Registered: ask the employee to use the QR card, and suggest they register their face in their app.
If the employee has an approved overtime allowance, the screen marks it as Overtime meal (extra allowance).
Face scan and typing an ID
For when a card is left behind or the employee's phone has a problem.
1Face scan (Premium plan)
An employee who has registered their face just looks at the camera, no card needed.
- Tap the Face Scan tab.
- Ask the employee to face the camera straight on, with enough light.
- The screen shows Face recognised or Face does not match. The system also checks that a live person is in front of the camera (Liveness).
- If it does not match or fails, use the QR card or the Type ID tab.
Face photos are not stored. Only an encrypted string of numbers is compared. Some employees must verify their face before claiming, and the screen tells you when that applies.
2Type ID (manual entry)
Used when a card is left behind, the phone is dead, the QR is damaged, or the employee is new. The admin can turn this off (the screen then says Turned off by admin).
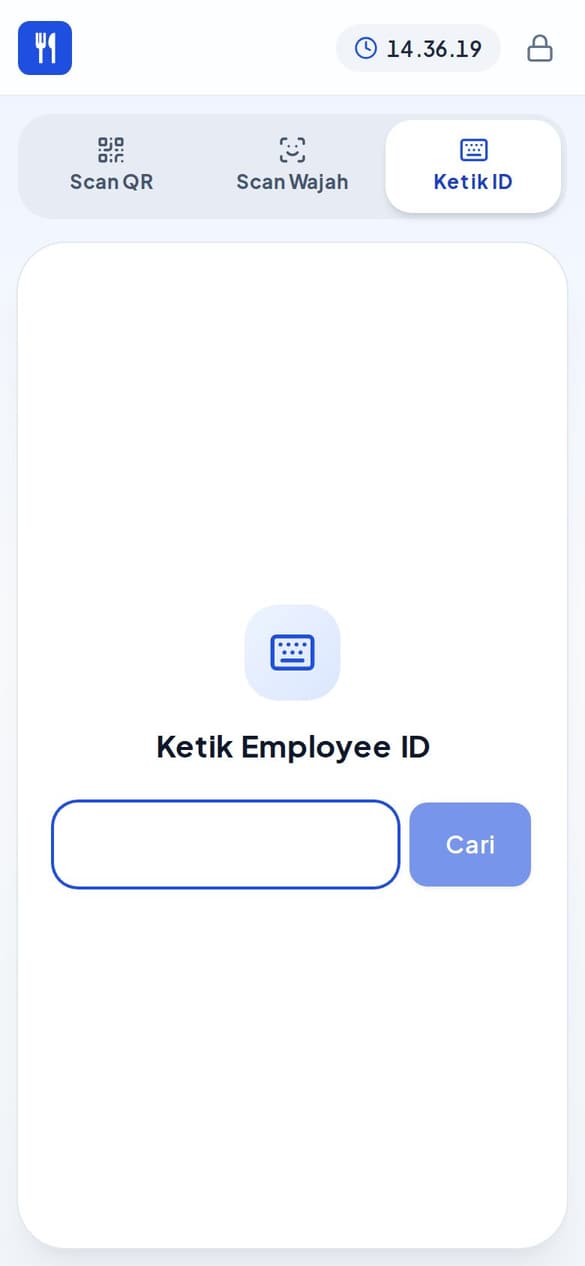
- Tap the Type ID tab.
- Type the Employee ID (the employee code, for example D001) or scan it with a USB scanner, then tap Find.
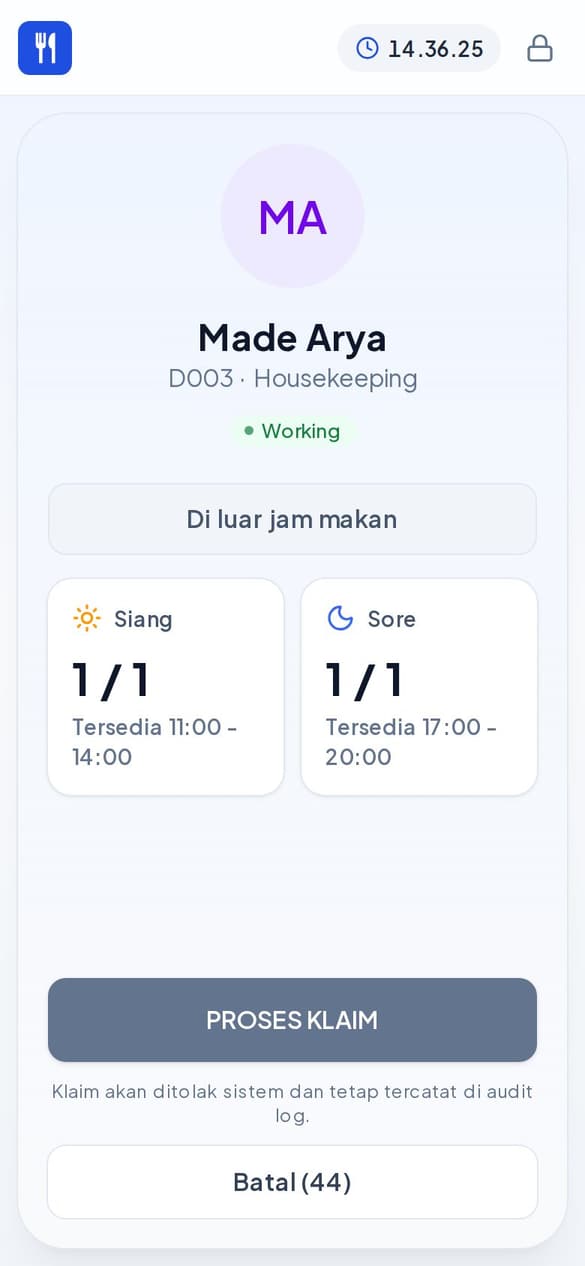
- Check Check allowance status: allowance available, already used, or outside meal times.
- Choose a reason for manual entry (required): Card left behind, Phone dead / no phone, QR damaged / unreadable, New employee, or write another reason.
- Tap PROCESS CLAIM. The Cancel button with a countdown clears the screen if you do not continue.
Every manual entry is recorded with its reason in the audit log, and excessive manual entries are flagged by the system. Use it only when needed.
An employee who must verify their face cannot be claimed through ordinary manual entry.
3Guest vouchers
Guests get a voucher as a QR code or a typed code, starting with TAMU-.
- Scan the guest voucher QR like an employee card, or type the code on the Type ID tab.
- The result appears the same as an employee claim.
When the internet is down
QR scans are still recorded and sent automatically once connected.
1Scanning keeps working
If the canteen's internet goes down, the screen shows a No internet notice. Employee QR scans are still recorded on the phone and sent when it reconnects. The employee may eat.
- Keep scanning QR cards as usual. The screen marks the claim as Recorded offline.
- The screen shows n scans waiting to be sent. When the internet returns, sending happens by itself. You can also tap Send now.
- Claims with a problem (for example expired or invalid data) go to Needs review. Tell the admin or HR.
Offline claims that wait too long (more than 12 hours) expire and are not accepted. Reconnect to the internet quickly. A phone hotspot works as a backup.
Face scan and manual entry need the internet.
Kiosk mode (Android app)
Lock the phone so it only shows the Scan screen.
1Turning on kiosk mode
Only in the Canteenku Android app, and only for operator accounts. Good for a phone or tablet fixed in the canteen.
- On the Scan screen, tap the Kiosk mode button at the top right.
- Read the explanation, then tap Turn on.
- The screen stays on and fills the display. The phone is locked to Canteenku: the Home and Recent buttons cannot be used to leave.
- After the phone restarts or the app is updated, the app opens by itself and kiosk mode stays on.
2Leaving kiosk mode
- Tap the padlock icon at the top right.
- Enter the operator account password. You cannot leave without the password.
- Choose Dashboard (opens for 15 minutes, then locks again), Sign out, or Unpin the phone to turn kiosk mode off.
Do not share the operator password with other employees. Repeated wrong passwords delay the next attempt for 5 minutes.
Frequently asked questions
Short answers to the most common problems.
- A claim was refused. What do I tell the employee?
- Read the reason on screen: allowance already used (with the time and place), outside meal times, a status of Off, Leave, or Inactive, or a face that does not match. If the employee thinks it is a mistake, send them to HR. HR and Finance can check and correct it under Corrections & Disputes.
- The camera does not start.
- Allow camera access in the browser or app settings, then tap Turn camera on. Backup: use a USB QR scanner on the Type ID tab.
- The employee's QR card will not scan.
- Ask the employee to turn up the screen brightness and clean the screen, then bring it closer. If it still fails, use Type ID with the reason QR damaged / unreadable.
- What about guests?
- Scan the guest voucher QR (starting with TAMU-) or type the code on the Type ID tab.
- I forgot my password.
- Tap Forgot password? on the sign-in page, or ask the admin to reset it. Operator accounts without an email are reset by the admin.
- The kiosk phone is locked and I cannot leave.
- Tap the padlock icon, enter the operator account password, then choose Unpin the phone.
Still have questions?
Contact us on WhatsApp +62 857-0779-9569 or by email at awantechsolution.bali@gmail.com. Tell us your role and the name of the menu you opened.