Employee guide contents
For every employee who receives a company meal allowance. Everything is done from your phone.
The screenshots show the app in Indonesian. In the app, open Profile & Account and choose EN to switch the language.
What you can do
- Collect your meal with a QR card or face scan
- See your meal history, daily and monthly
- Give ratings and comments on the menu
- Request an overtime meal
- Set your dietary needs (vegetarian, allergies)
Outside this role
- Change or delete your meal history
- Lend your allowance or card to someone else
- See other employees' data
- Change meal times or the menu
- 1Get started: sign in and install
Sign in, install on your phone, turn on notifications, and set up your account. - 2Collecting your meal
Show your QR card to the staff, or simply face the camera. - 3Meal history
See all your claims, day by day and month by month. - 4Menu and ratings
See today's menu and rate it so the food keeps improving. - 5Overtime meals and dietary needs
An extra meal for overtime, plus allergies and vegetarian. - 6Help and the assistant
Ask how to use Canteenku at any time. - 7Frequently asked questions
Short answers to the most common problems.
Get started: sign in and install
Sign in, install on your phone, turn on notifications, and set up your account.
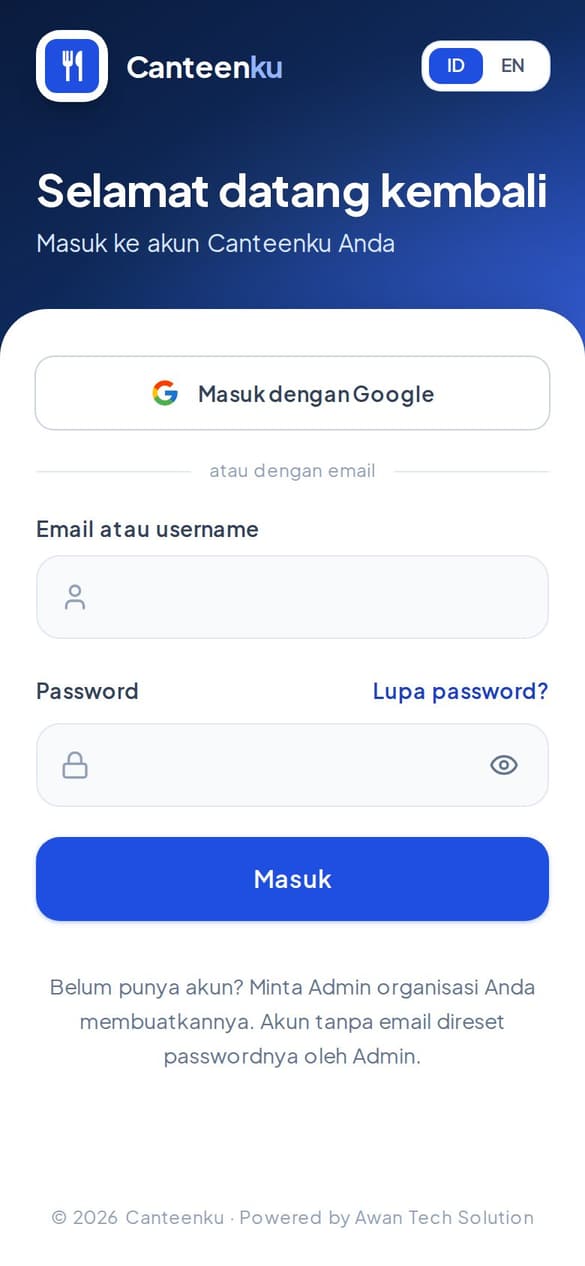
1Sign in to Canteenku
Your account is created by the admin or HR of your organisation. You do not need to register yourself.
- Open canteenku.cloud in Safari or Chrome, or open the Canteenku app if it is already installed.
- Enter the Email or username and Password your admin gave you, then tap Sign in.
- If your account uses a Google email, tap Sign in with Google.
- After signing in, you land on the home page for your role.
Forgot your password? Tap Forgot password? on the sign-in page, enter your email, and follow the button in the email. Accounts without an email: ask your admin to reset the password.
After your first sign-in, change your password in Profile & Account so only you know it.
2Install it on your phone
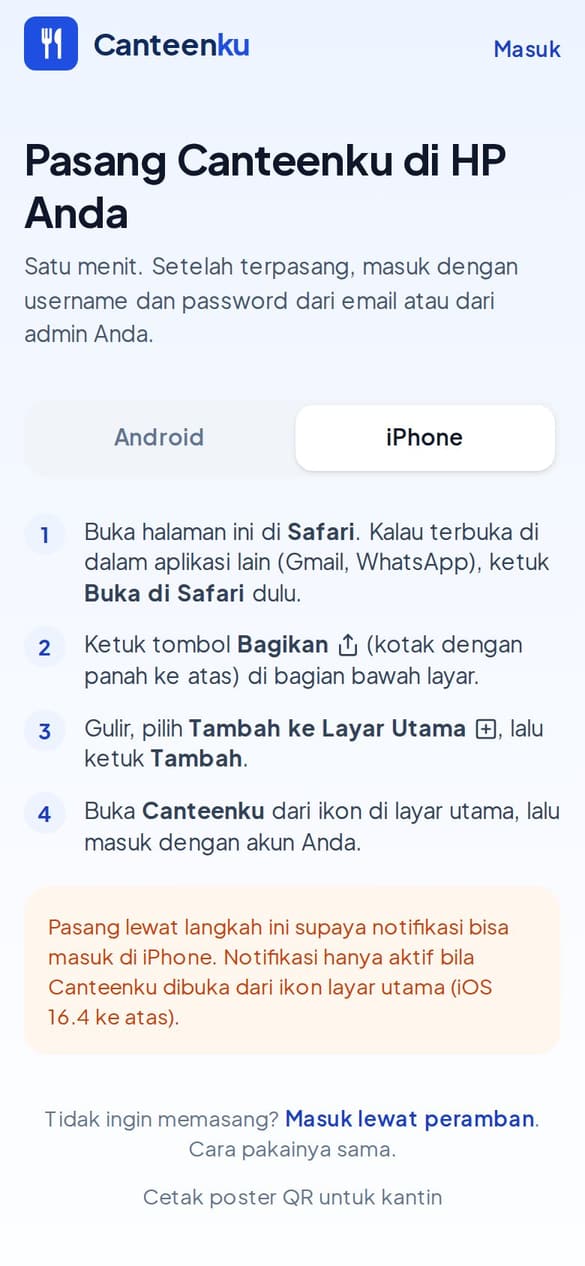
Canteenku works in a browser, but it is more convenient installed like an app. Choose your phone.
- Android: open canteenku.cloud/unduh, tap the download button, open the Canteenku.apk file from the notification or the Files app, allow install from this source if asked, then tap Install.
- iPhone: open canteenku.cloud in Safari, tap the Share button (a box with an arrow pointing up) at the bottom of the screen, choose Add to Home Screen, then tap Add.
- Open Canteenku from the icon on your home screen and sign in with your account.
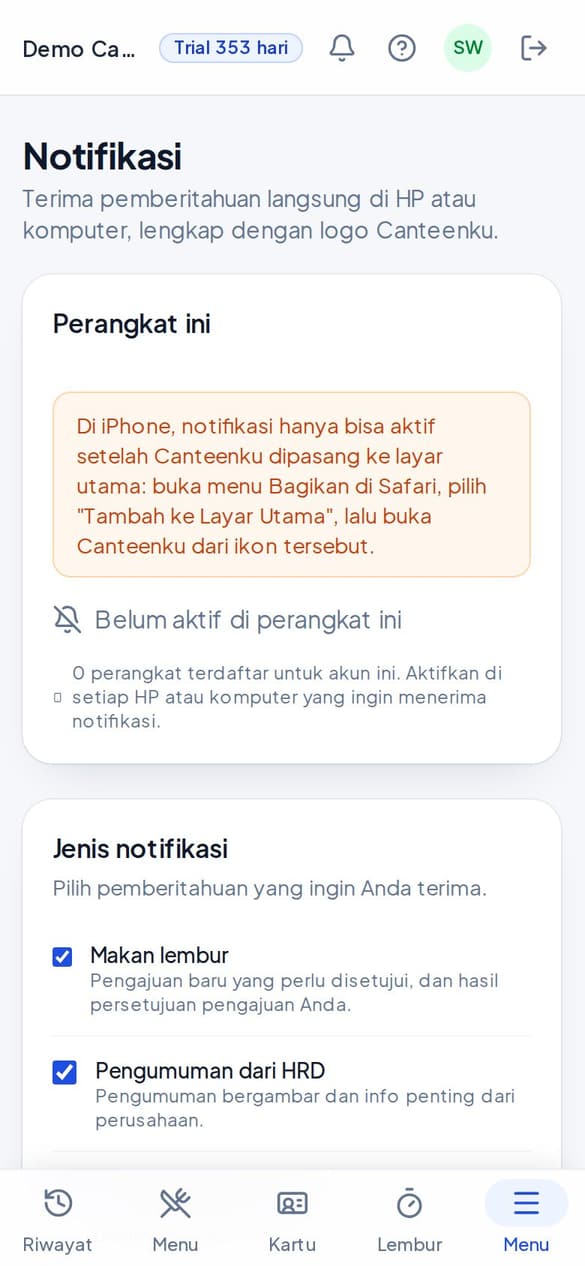
On iPhone, notifications only work when Canteenku is opened from the icon on the home screen (iOS 16.4 or later), not from regular Safari.
3Turn on notifications
Notifications tell you what matters right on your phone or computer, with the Canteenku logo.
- Open Notifications (from the main menu or the bell icon).
- Under This device, tap Turn on notifications, then choose Allow when your phone asks.
- Under Notification type, tick the notifications you want to receive.
Turn this on for every phone or computer you use. The setting applies per device.
4Profile, password, and language
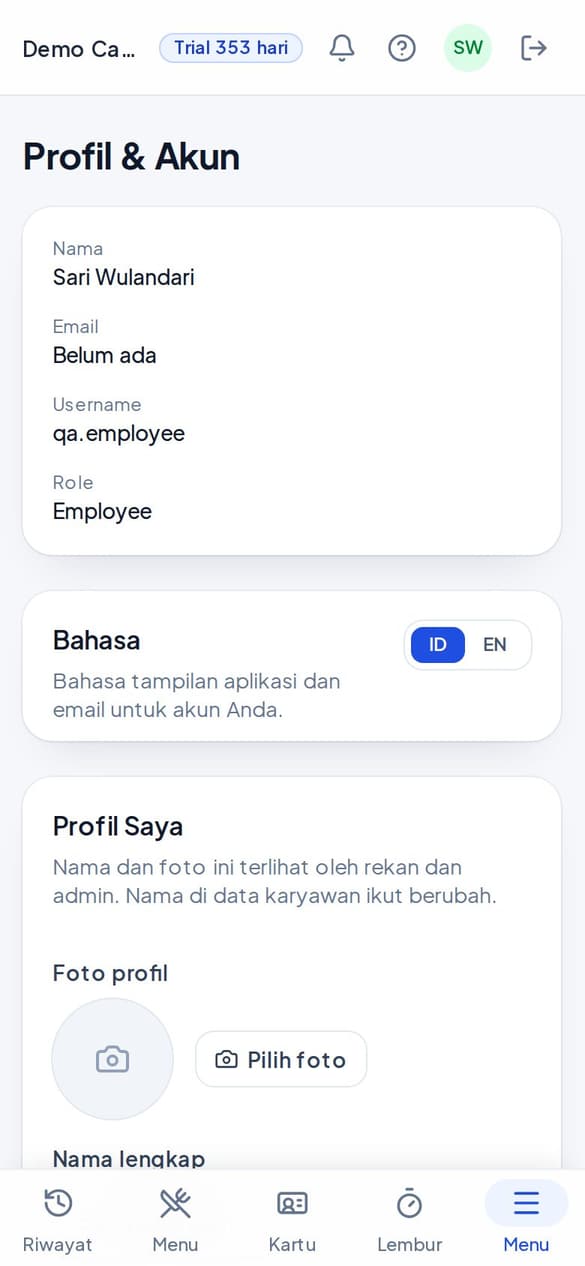
It is all in the Profile & Account menu.
- Open Profile & Account from the main menu.
- Language: choose ID (Indonesian) or EN (English) for the app and email.
- Profile photo: tap Choose photo. Colleagues and admins can see your photo.
- Change password: tap Change password, enter a new password, then save.
- Two-step verification (2FA): turn it on for extra protection. Some organisations require it for certain roles.
Never share your password or QR card. Every claim is recorded in the account owner's name.
Collecting your meal
Show your QR card to the staff, or simply face the camera.
1With your QR card
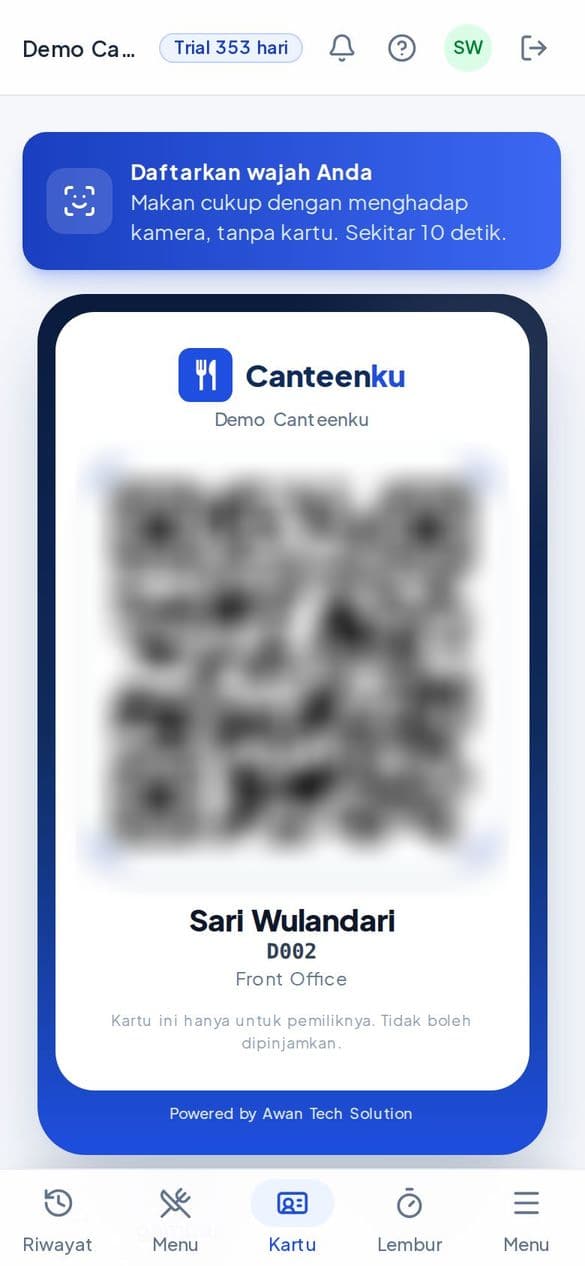
Your QR card lives on your phone, so there is no physical card to carry.
- Open My Card from the bottom menu bar.
- Show the QR code to the canteen staff, or point it at the scanning camera.
- The result appears on the staff's screen: success or refused with the reason.
Turn up your screen brightness and keep your finger off the QR code so it scans easily.
This card is for its owner only and must not be lent. Every claim is recorded in your name.
2With a face scan
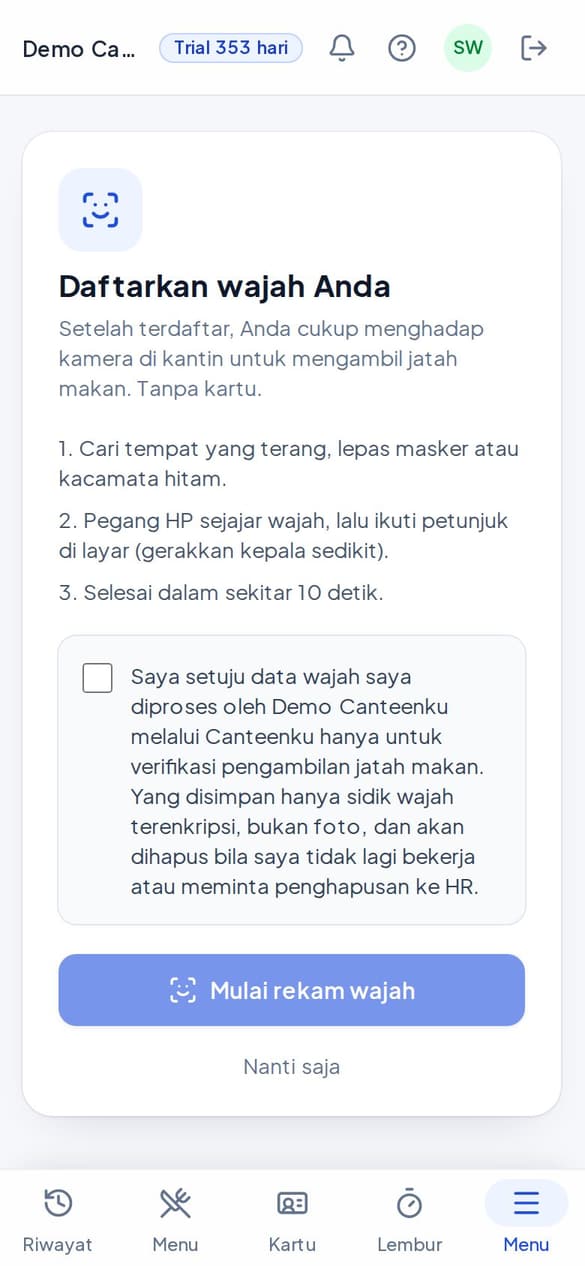
If your canteen uses face scanning, just face the camera. Register your face once, about 10 seconds.
- Open My Face ID (or tap the blue Register your face box in My Card).
- Find a bright spot, take off your mask or dark glasses, and look straight at the camera.
- Read the explanation, tick the consent, then tap Start recording face. The button only becomes active once the consent is ticked.
- Follow the on-screen instructions until it finishes. Want to wait? Tap Maybe later, and you can still use your QR card.
Your face photo is not stored. The camera turns your face into a string of numbers on your phone; only those numbers are sent and stored, encrypted, and they cannot be turned back into a photo. The data is deleted automatically when your status is deactivated.
3The meal allowance rules
- Each meal time (for example Lunch or Dinner) can be claimed once.
- You can only claim during the meal time that applies to you.
- A work status of Off, Leave, or Inactive in the roster gets no allowance.
Allowances cannot be transferred or lent.
Meal history
See all your claims, day by day and month by month.
1Reading your history
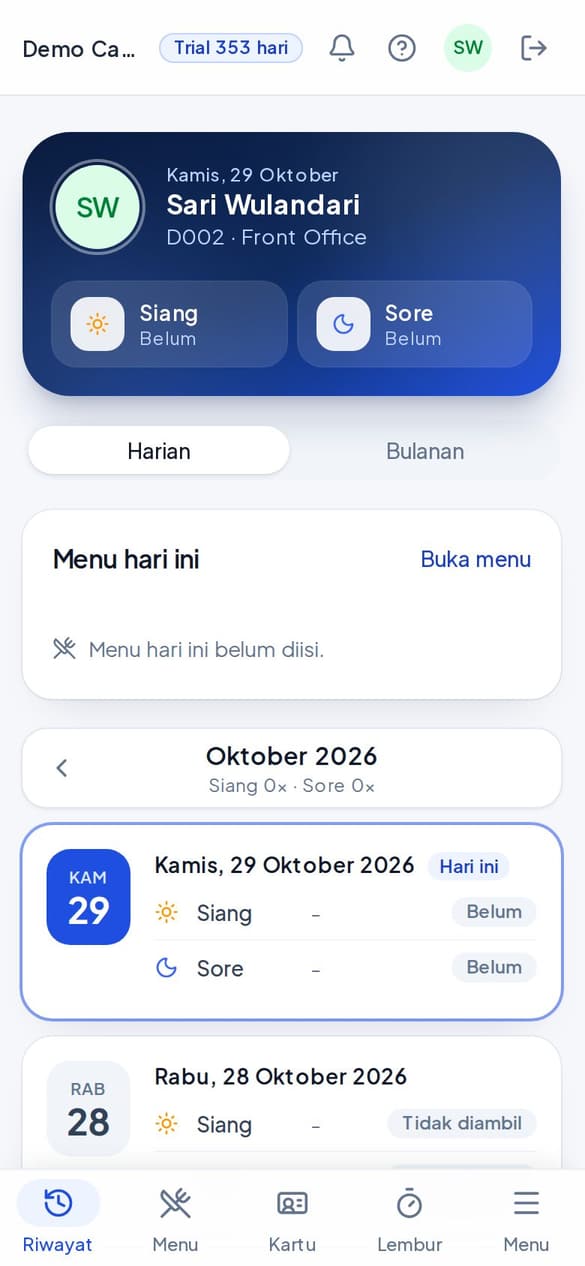
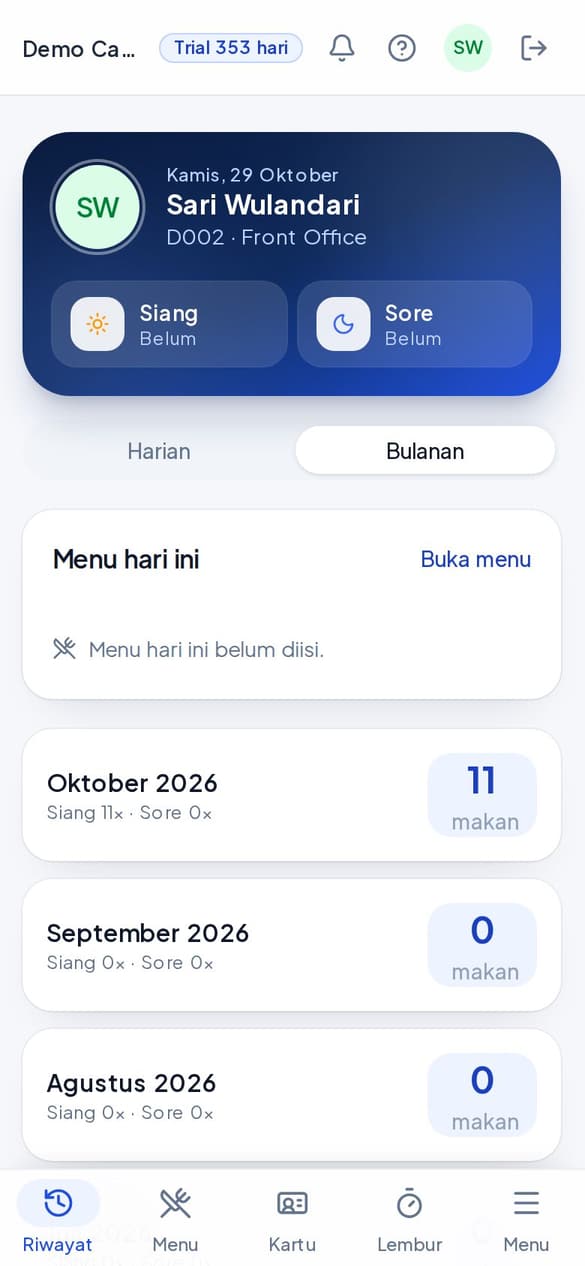
What the statuses mean: Eaten (claim succeeded), Not yet (meal time not collected), Not taken, Voided, and Reported.
- Open Meal History from the bottom menu bar (the first page after signing in).
- The Daily tab shows each day with the status of each meal time. The arrows at the top change the month.
- The Monthly tab shows how many meals per month.
History can be viewed but not changed, so reports stay honest.
2A claim that is not mine
If your history shows a claim at a time you did not eat, report it.
- Open that day's history and tap Not me on the claim.
- Write a short Note (at least 5 characters), then tap Send report.
- The admin checks your report. If it is confirmed, your allowance is returned.
Claims older than 14 days can no longer be reported in the app. Contact HR.
Menu and ratings
See today's menu and rate it so the food keeps improving.
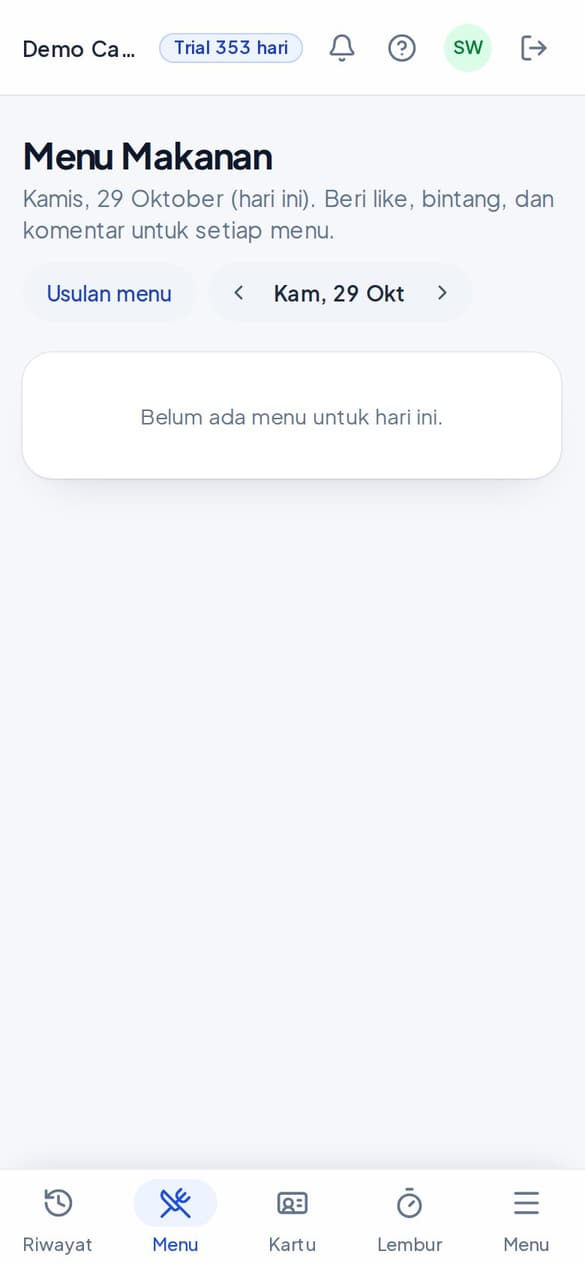
1Viewing today's menu
- Open Menu from the bottom menu bar, or tap Open menu on the Today's menu card on the Meal History page.
- The arrows at the top change the day. The menu appears once the kitchen or HR has filled it in.
- Tap Suggest a dish to suggest food you would like.
2Giving a rating
- Open your history or that day's menu, then tap Rate.
- Choose 1 to 5 stars. You can add a comment.
- Tap Send rating.
Your comment is anonymous to the vendor. Ratings help the canteen keep the food at a good standard.
Overtime meals and dietary needs
An extra meal for overtime, plus allergies and vegetarian.
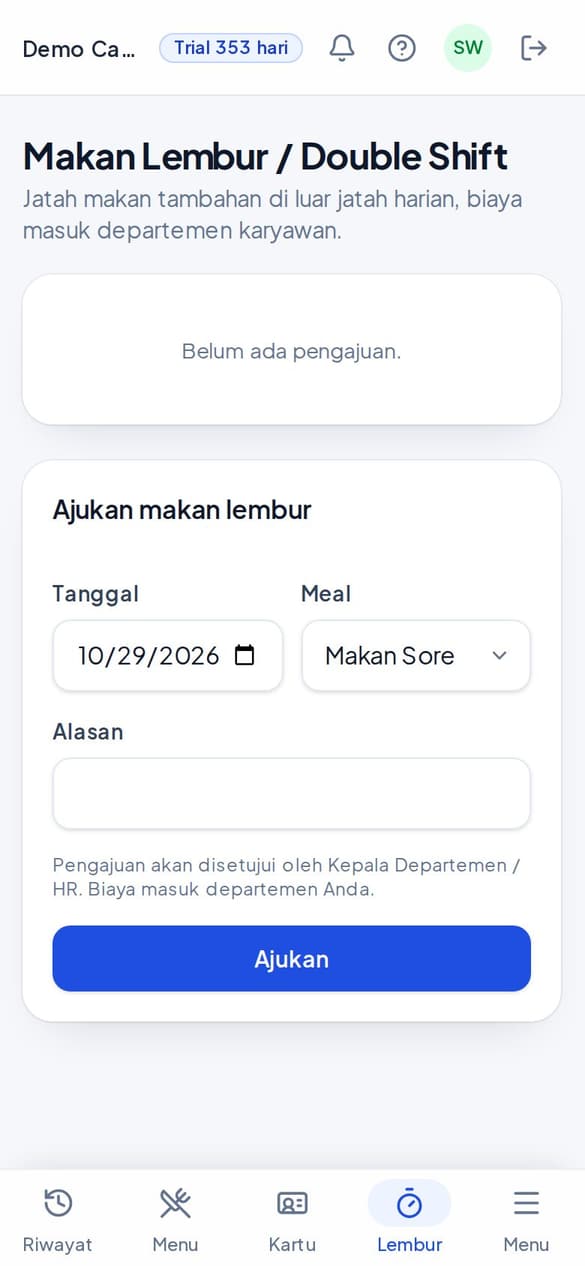
1Requesting an overtime meal
For an extra meal beyond your daily allowance, for example a double shift. The cost goes to your department.
- Open Overtime in the bottom menu bar.
- Choose the Date and Meal, then write the Reason.
- Tap Submit. Your Department Head or HR approves it, and you receive the result as a notification.
2Dietary needs: vegetarian and allergies
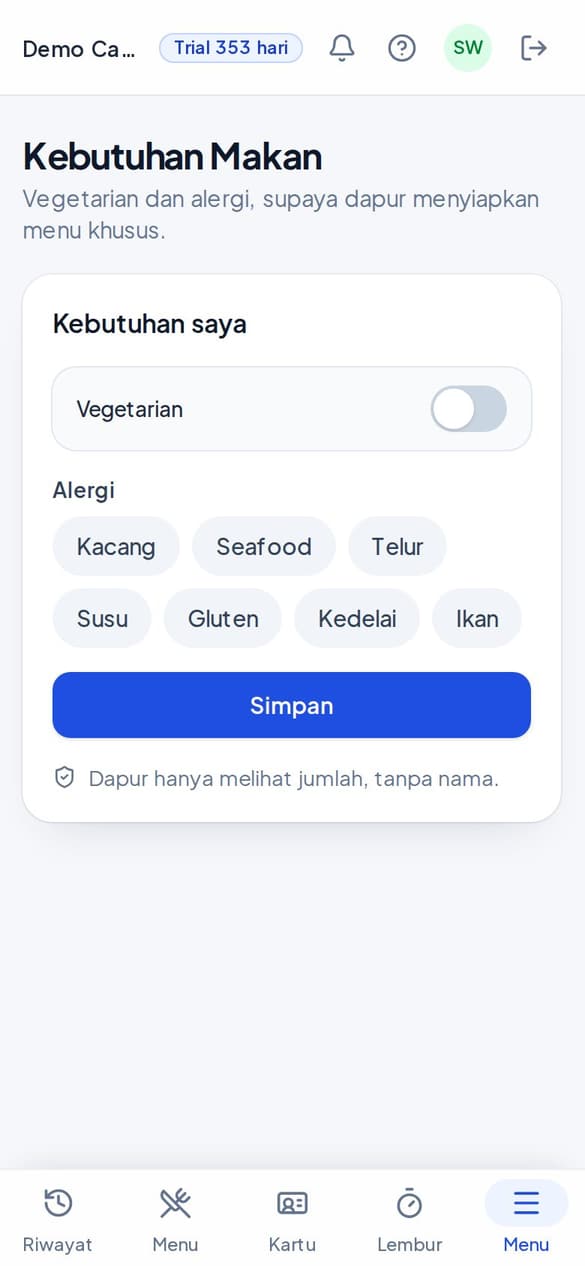
- Open Dietary Needs from the menu.
- Switch on Vegetarian if needed, and tap your allergies (Peanuts, Seafood, Eggs, Milk, Gluten, Soy, Fish).
- Tap Save.
The kitchen only sees counts, never your name, so it can prepare special meals.
3My Wallet
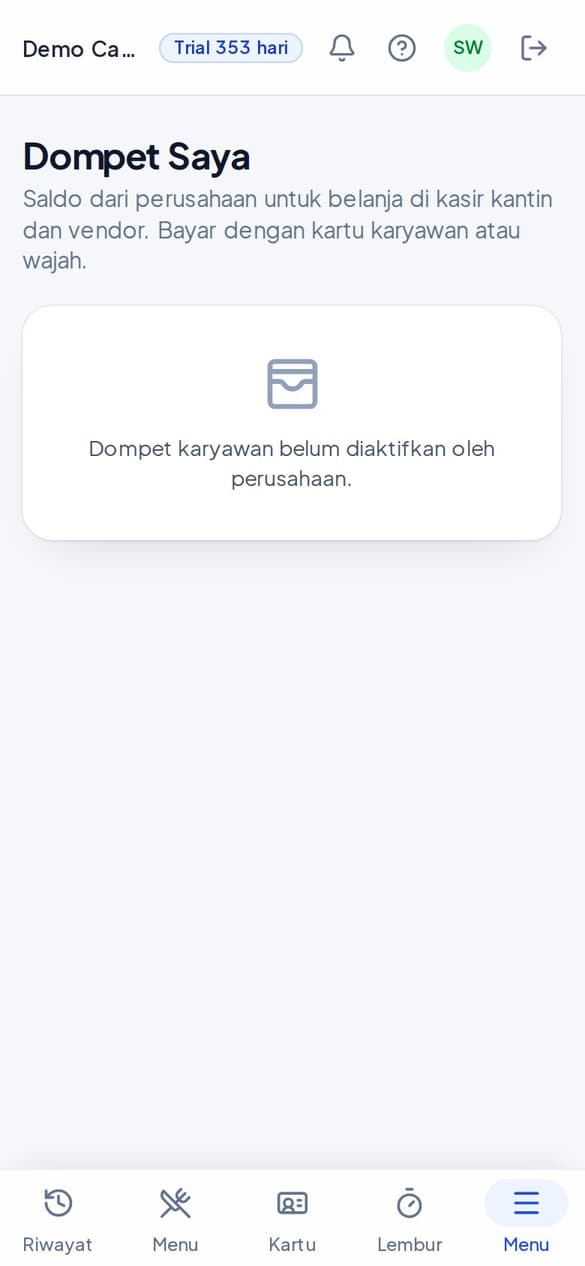
If your company turns on the employee wallet, the balance can be used to shop at the canteen till and vendors, paid with your card or your face. If it is not on yet, the page says the company has not activated the employee wallet.
Help and the assistant
Ask how to use Canteenku at any time.
1Help Assistant
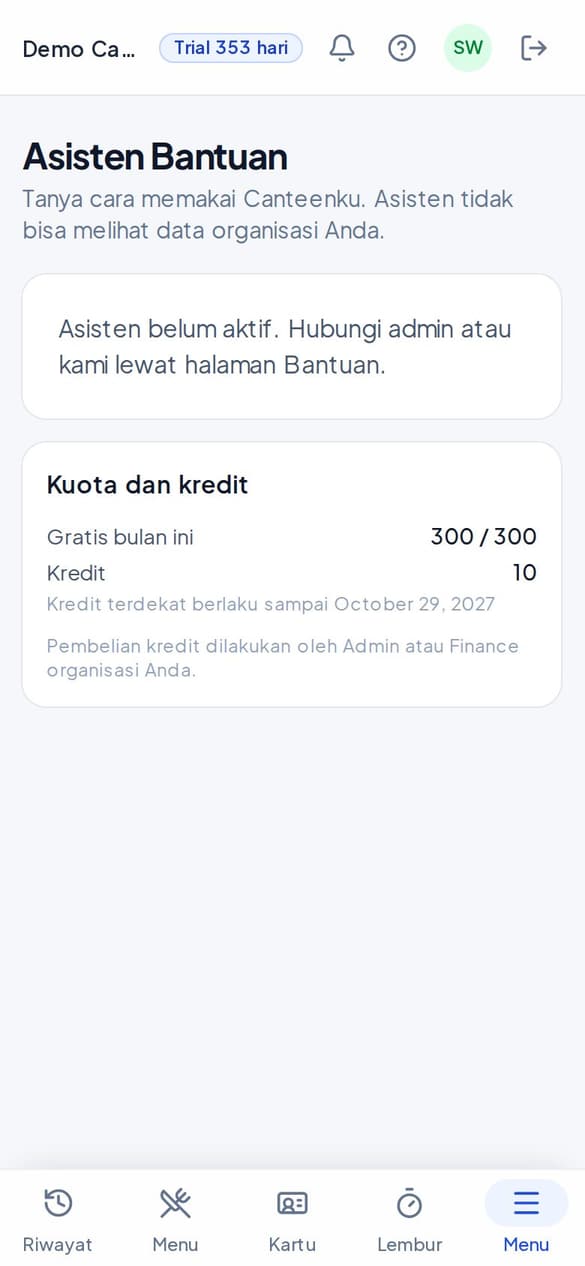
The assistant answers how to use Canteenku. It cannot see your organisation's data. The free quota and credit are shown on its page, and the assistant is active when your organisation turns it on.
- Open Help Assistant from the menu.
- Type your question and send it.
2The Help page
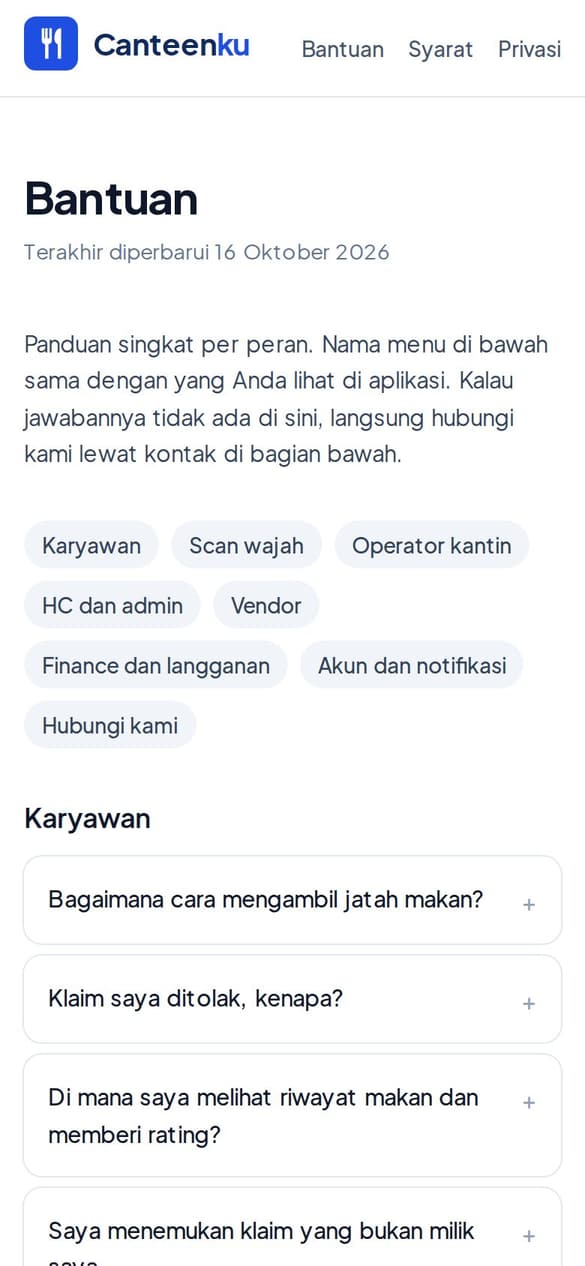
Tap the ? icon at the top to open the Help page with questions and answers for each role.
Frequently asked questions
Short answers to the most common problems.
- Why was my claim refused?
- The most common reasons: that meal time was already collected (the screen shows the time and place of the earlier claim), it is outside your meal time, your work status is Off, Leave, or Inactive, or your face does not match the registered data. If you think it is a mistake, tell HR.
- My face often does not match.
- Face the camera straight on, take off a mask or dark glasses, and make sure there is enough light. If it still fails, ask HR to register your face again. In the meantime, use your QR card.
- My QR card will not scan.
- Turn up the screen brightness, clean the screen, and hold it closer to the scanner. If it still fails, ask the staff to type your Employee ID.
- Notifications do not arrive on iPhone.
- Make sure Canteenku is opened from the icon on the home screen (not from Safari), on iOS 16.4 or later, then turn them on in the Notifications menu.
- Where is my face photo?
- There is no photo. Only an encrypted string of numbers that cannot be turned back into a photo. You can ask HR to delete your face registration at any time.
- I forgot my password.
- Tap Forgot password? on the sign-in page and follow the button in the email. Accounts without an email: ask your admin to reset it.
Still have questions?
Contact us on WhatsApp +62 857-0779-9569 or by email at awantechsolution.bali@gmail.com. Tell us your role and the name of the menu you opened.