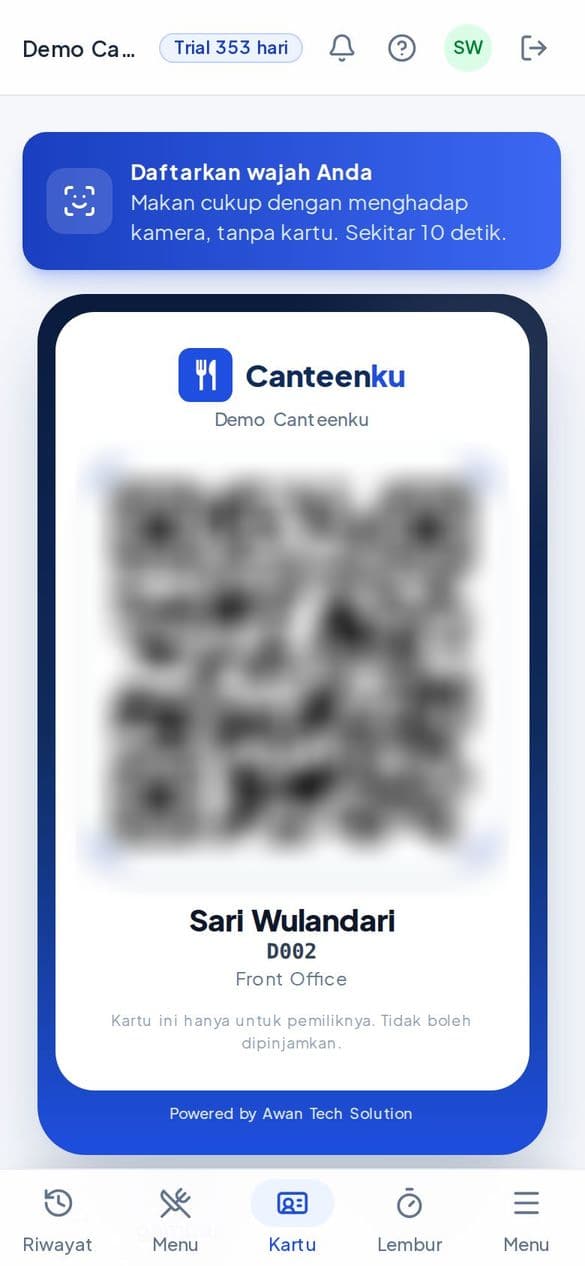
Department Head guide contents
For department heads and managers who are responsible for their team and its meal costs. Everything you see is limited to your own department.
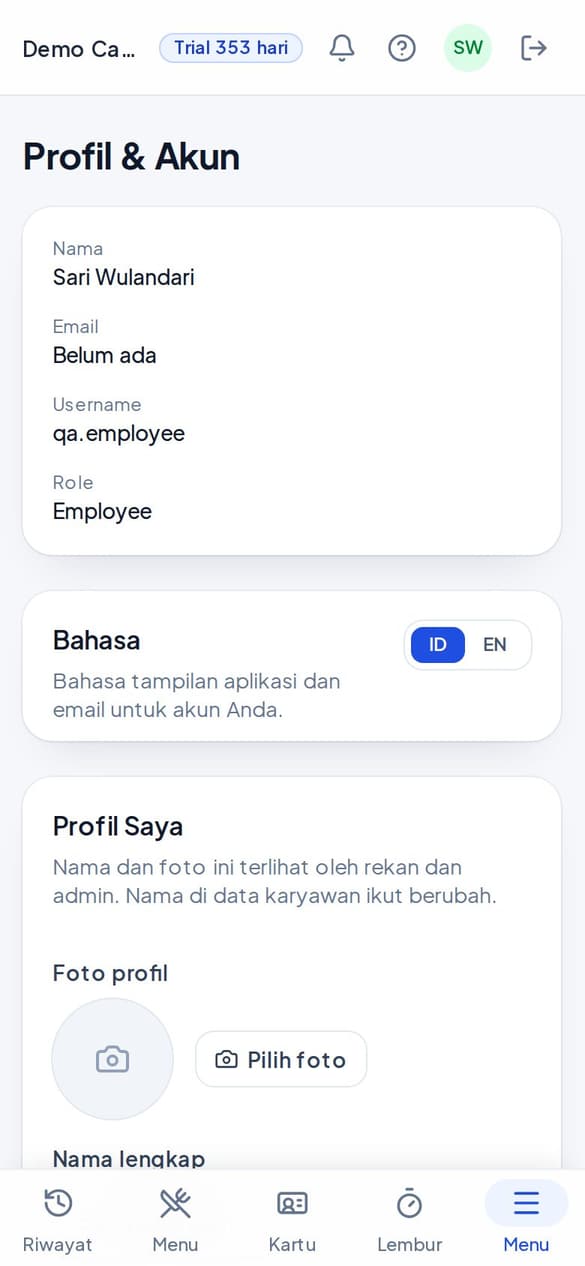
The screenshots show the app in Indonesian. In the app, open Profile & Account and choose EN to switch the language.
What you can do
- Fill in the team's duty roster and days off
- Approve or grant overtime meals
- Create guest vouchers charged to your department
- Track the department's budget, reports, and analytics
- See dietary needs (vegetarian, allergies) and menu ratings
Outside this role
- See or change other departments
- Change meal times, prices, or organisation settings
- Add or delete employees
- Change the roster for past dates (Admin or HR only)
- 1Get started: sign in and install
Sign in, install on your phone, turn on notifications, and set up your account. - 2The department dashboard
Today's summary and shortcuts to the main tasks. - 3The team's duty roster
Today's roster decides who may eat at the canteen. - 4Overtime meals
An extra meal allowance for overtime or a double shift. The cost goes to your department. - 5Guests and vouchers
QR vouchers for guests, vendor staff, contractors, trainees, or groups. - 6Budget, reports, and analytics
Track your department's usage and meal costs. - 7Employees, dietary needs, and ratings
See your team and feedback about the food. - 8Frequently asked questions
Short answers to the most common problems.
Get started: sign in and install
Sign in, install on your phone, turn on notifications, and set up your account.
1Sign in to Canteenku
Your account is created by the admin or HR of your organisation. You do not need to register yourself.
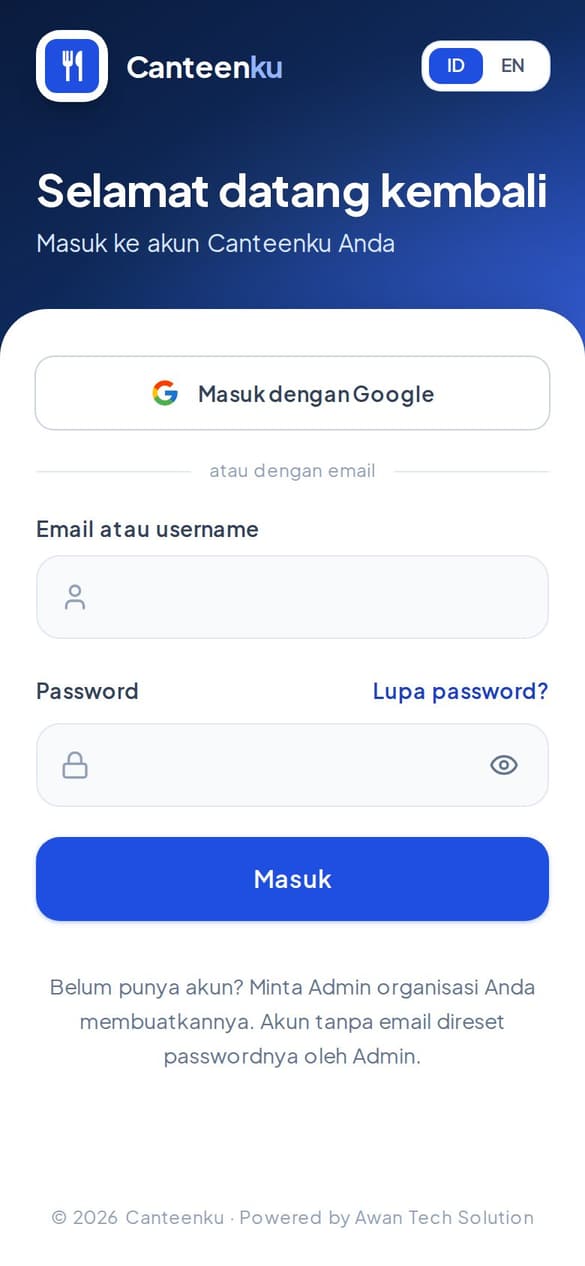
- Open canteenku.cloud in Safari or Chrome, or open the Canteenku app if it is already installed.
- Enter the Email or username and Password your admin gave you, then tap Sign in.
- If your account uses a Google email, tap Sign in with Google.
- After signing in, you land on the home page for your role.
Forgot your password? Tap Forgot password? on the sign-in page, enter your email, and follow the button in the email. Accounts without an email: ask your admin to reset the password.
After your first sign-in, change your password in Profile & Account so only you know it.
2Install it on your phone
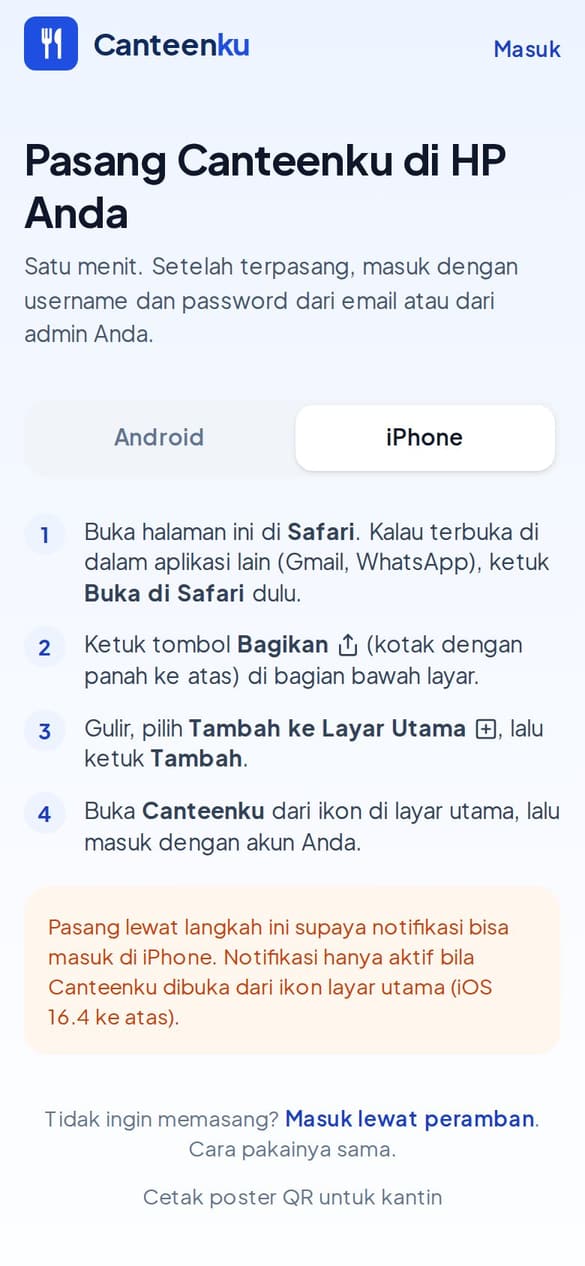
Canteenku works in a browser, but it is more convenient installed like an app. Choose your phone.
- Android: open canteenku.cloud/unduh, tap the download button, open the Canteenku.apk file from the notification or the Files app, allow install from this source if asked, then tap Install.
- iPhone: open canteenku.cloud in Safari, tap the Share button (a box with an arrow pointing up) at the bottom of the screen, choose Add to Home Screen, then tap Add.
- Open Canteenku from the icon on your home screen and sign in with your account.
On iPhone, notifications only work when Canteenku is opened from the icon on the home screen (iOS 16.4 or later), not from regular Safari.
3Turn on notifications
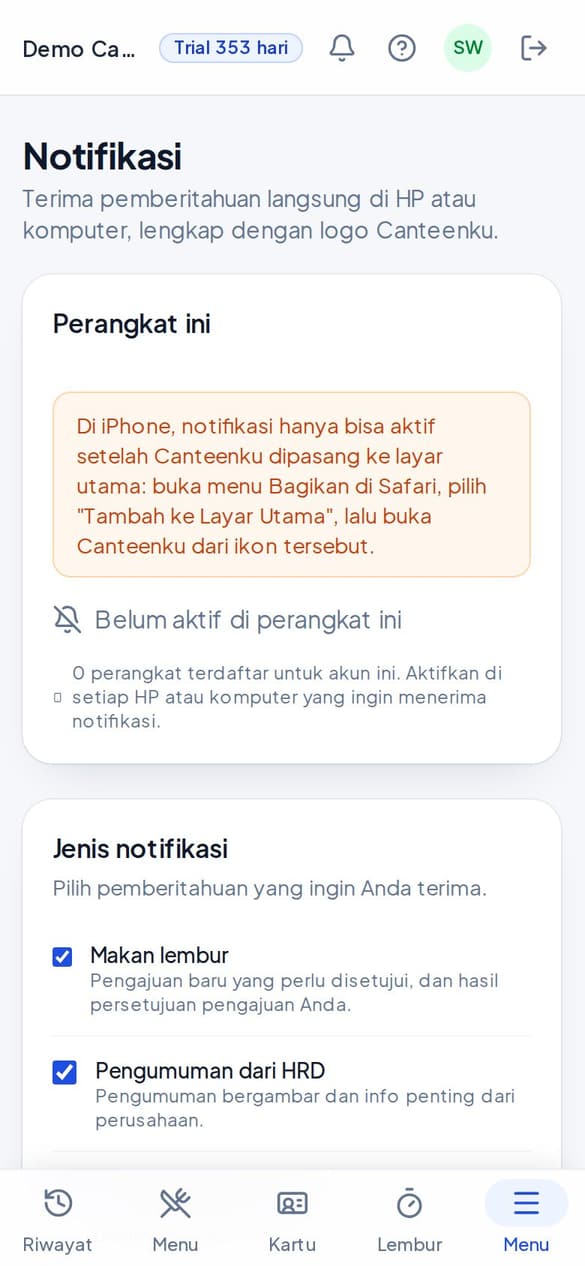
Notifications tell you what matters right on your phone or computer, with the Canteenku logo.
- Open Notifications (from the main menu or the bell icon).
- Under This device, tap Turn on notifications, then choose Allow when your phone asks.
- Under Notification type, tick the notifications you want to receive.
Turn this on for every phone or computer you use. The setting applies per device.
4Profile, password, and language
It is all in the Profile & Account menu.
- Open Profile & Account from the main menu.
- Language: choose ID (Indonesian) or EN (English) for the app and email.
- Profile photo: tap Choose photo. Colleagues and admins can see your photo.
- Change password: tap Change password, enter a new password, then save.
- Two-step verification (2FA): turn it on for extra protection. Some organisations require it for certain roles.
Never share your password or QR card. Every claim is recorded in the account owner's name.
The department dashboard
Today's summary and shortcuts to the main tasks.
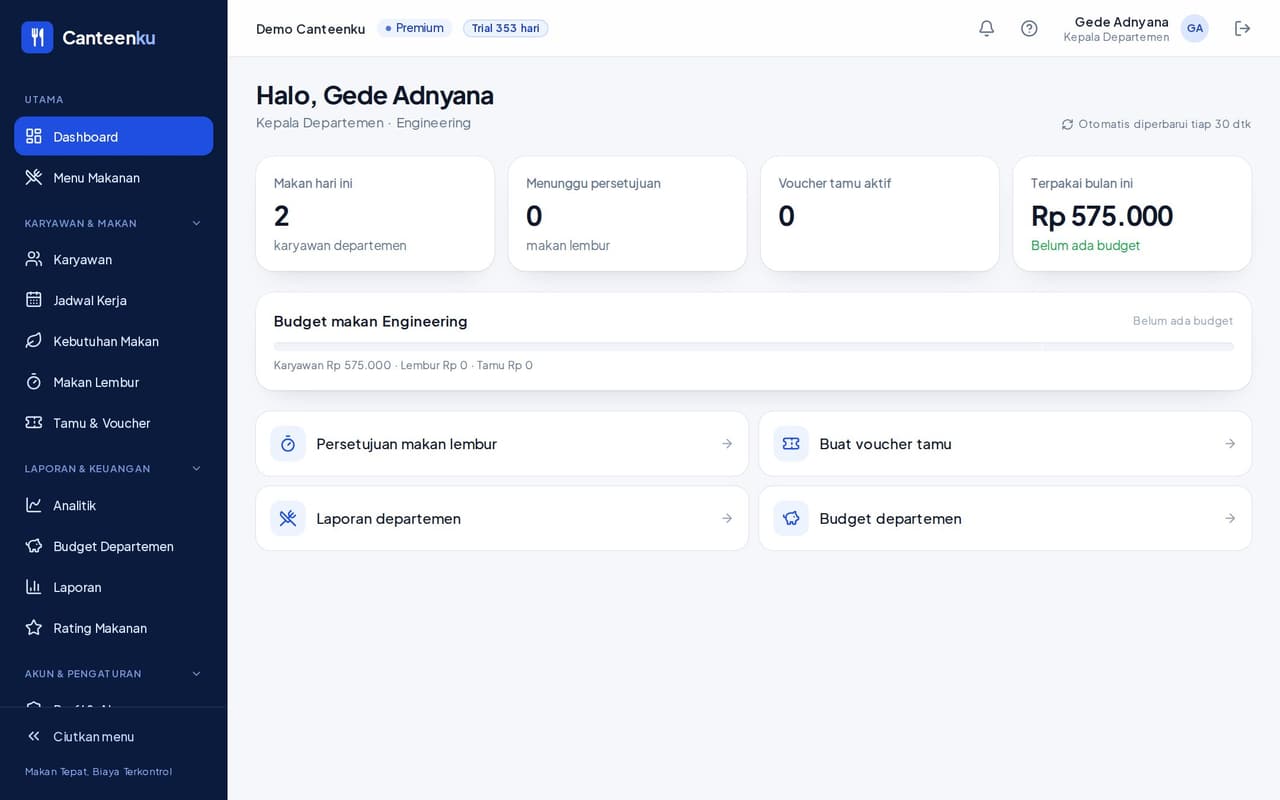
1Reading the dashboard
After you sign in, the first page greets you by name and shows your department.
- Meals today: how many employees in your department have eaten.
- Awaiting approval: overtime meal requests waiting for your decision.
- Active guest vouchers: vouchers that are still valid.
- Used this month: the department's meal cost for the current month, with the Meal budget below it.
- Four shortcuts take you straight to Overtime approval, Create guest voucher, Department report, and Department budget.
The team's duty roster
Today's roster decides who may eat at the canteen.
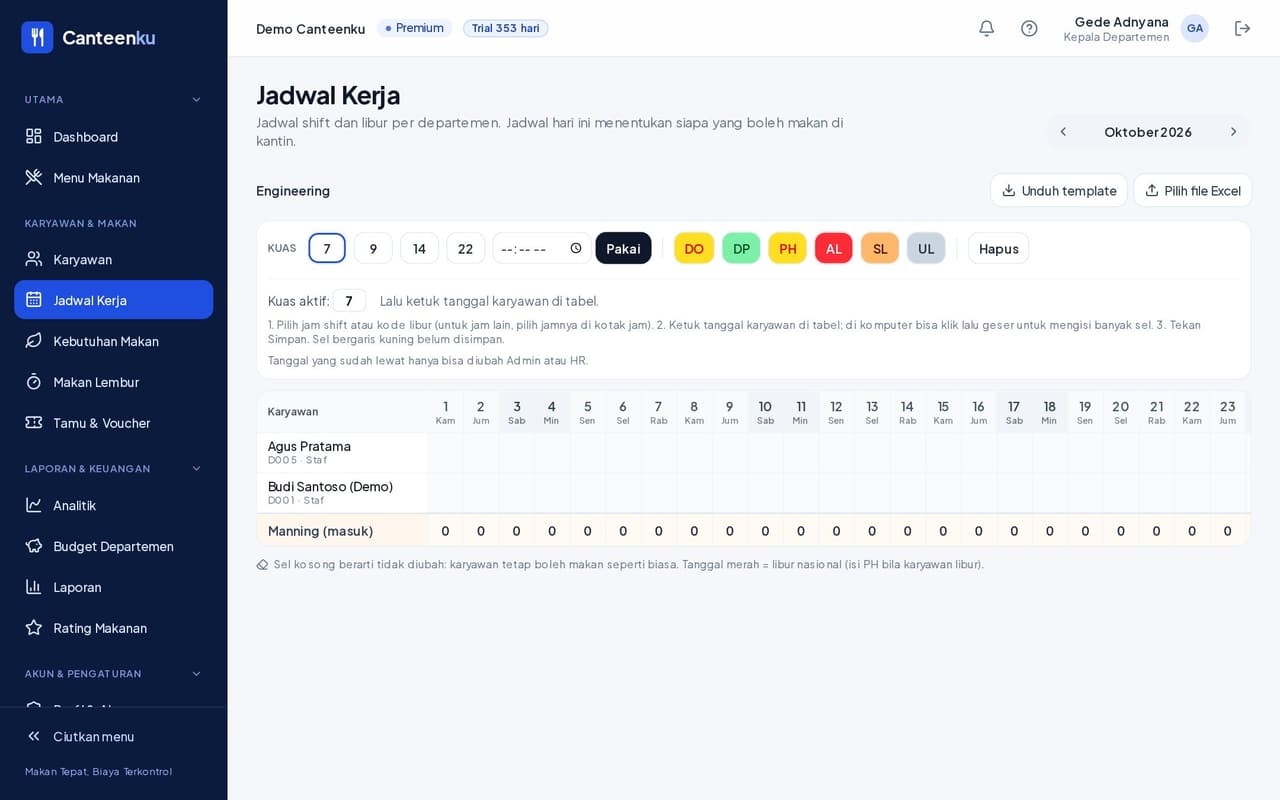
1Filling in shifts and days off
Open Duty Roster. Choose the month with the arrows at the top right. Each row is an employee, each column is a date.
- Pick a shift time from the brush above the table, or pick a day-off code (for example DP, PH, AL, SL, UL). For another time, type it in the time box, for example 7, 7.30, or 19:00.
- Tap an employee's date in the table. On a computer, click and drag to fill many cells at once.
- Press Save. Cells outlined in yellow are not saved yet.
- Tap Delete on the brush to clear a cell.
An empty cell means unchanged: the employee may still eat as usual. Red dates are national holidays (enter PH if the employee is off).
Dates that are already past can only be changed by an Admin or HR.
Need to fill a whole month? Use Download template, fill it in Excel, then import it again.
Overtime meals
An extra meal allowance for overtime or a double shift. The cost goes to your department.
1Approving employee requests
- Open Overtime Meals. The Awaiting approval tab shows requests that need your decision. The All tab shows the history.
- Read the request's date, meal time, and reason.
- Approve or refuse. The employee receives the result as a notification.
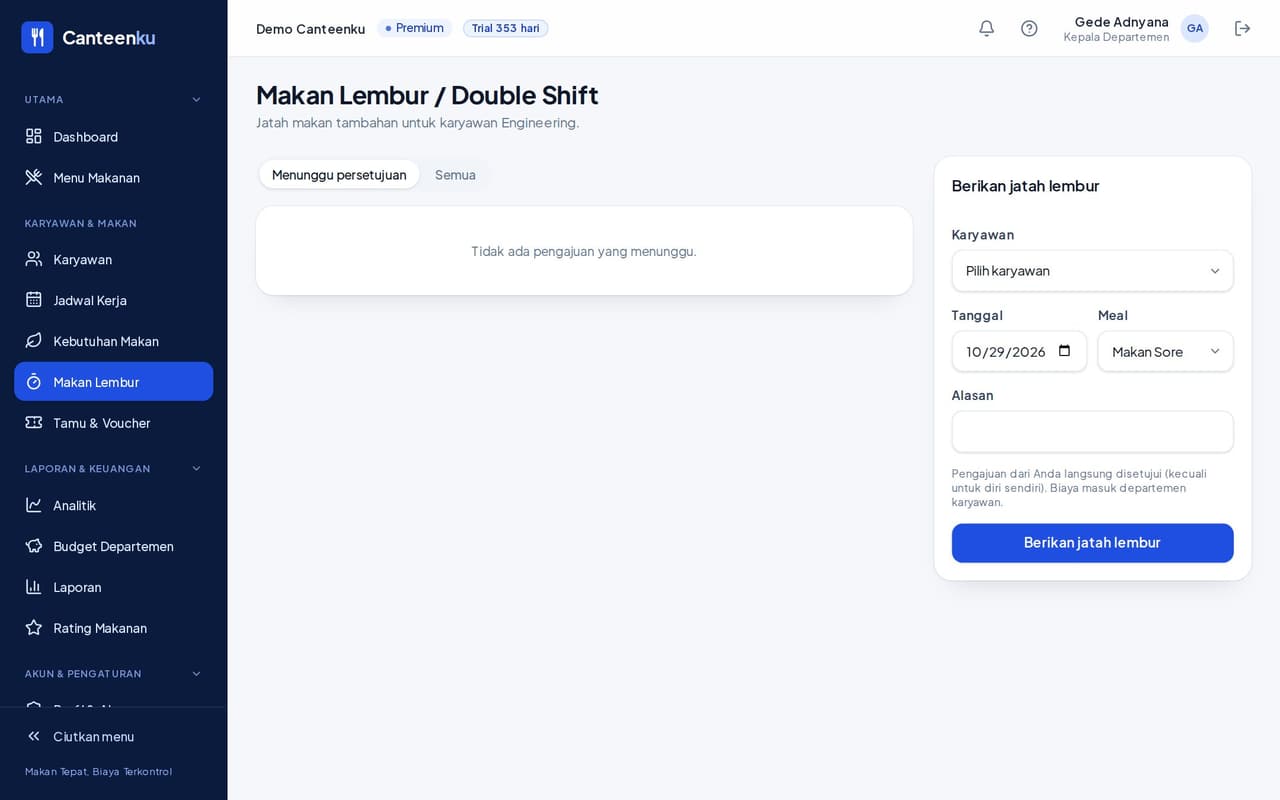
2Granting an overtime meal directly
In the Grant overtime meal box on the right side of the page:
- Choose the Employee, Date, and Meal (meal time).
- Write the Reason.
- Click Grant overtime meal. Because you are the one granting it, it is approved straight away and can be used at the canteen (except for yourself). The cost goes to the employee's department.
At the canteen, the operator sees the Overtime meal approved mark when that employee uses the extra allowance.
Guests and vouchers
QR vouchers for guests, vendor staff, contractors, trainees, or groups.
1Creating a guest voucher
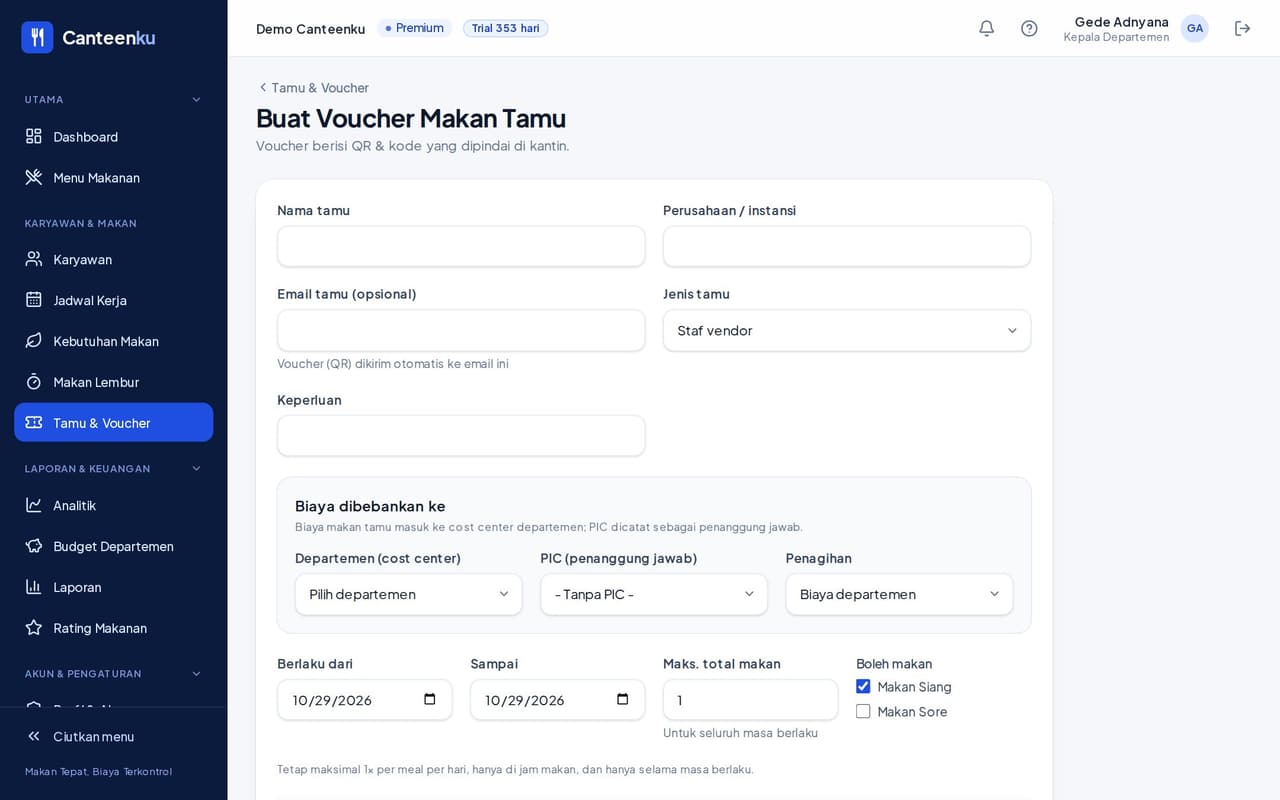
A voucher holds a QR and a code that is scanned at the canteen. The cost goes to the department's cost centre, and the PIC is recorded as the person in charge.
- Open Guests & Vouchers, then choose Create Voucher.
- Fill in the Guest name, Company / institution, and Guest type. The guest's email is optional: if you enter it, the QR voucher is sent automatically.
- Under Cost charged to, choose the Department (cost centre) and the PIC (person in charge).
- Set Valid from/to, Max. total meals, and the meal times that are allowed (Lunch and/or Dinner).
- Save. The voucher is ready to scan at the canteen.
Each voucher is still limited to 1 claim per meal time per day, only during meal times, and only while valid.
2Bulk vouchers and cancelling
- Bulk Vouchers: many vouchers at once for daily workers, event staff, or groups. The vouchers print on one sheet.
- Cancel: if the event ends early or a card is lost, cancel the voucher batch. The QR stops working immediately.
- Usage history cannot be changed or deleted.
Budget, reports, and analytics
Track your department's usage and meal costs.
1The department meal budget
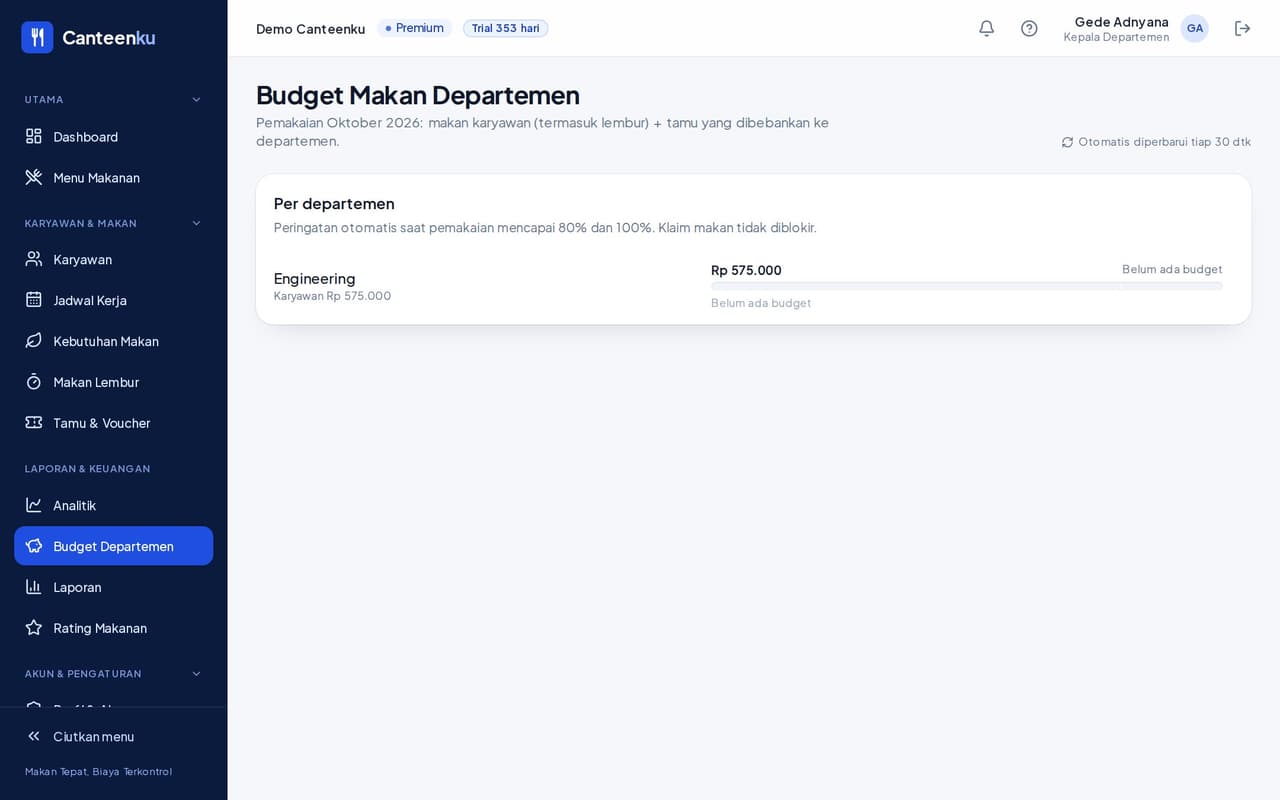
- Open Department Budgets to see this period's total usage and what is left.
- Usage is calculated automatically from employees' meal claims (including overtime) plus guest meals.
- The system sends an automatic reminder when usage reaches 80% and 100%. Meal claims are not blocked.
Finance or Admin sets the budget period. The 1st means a calendar month, and for example the 26th means a payroll period of the 26th to the 25th.
2Department reports
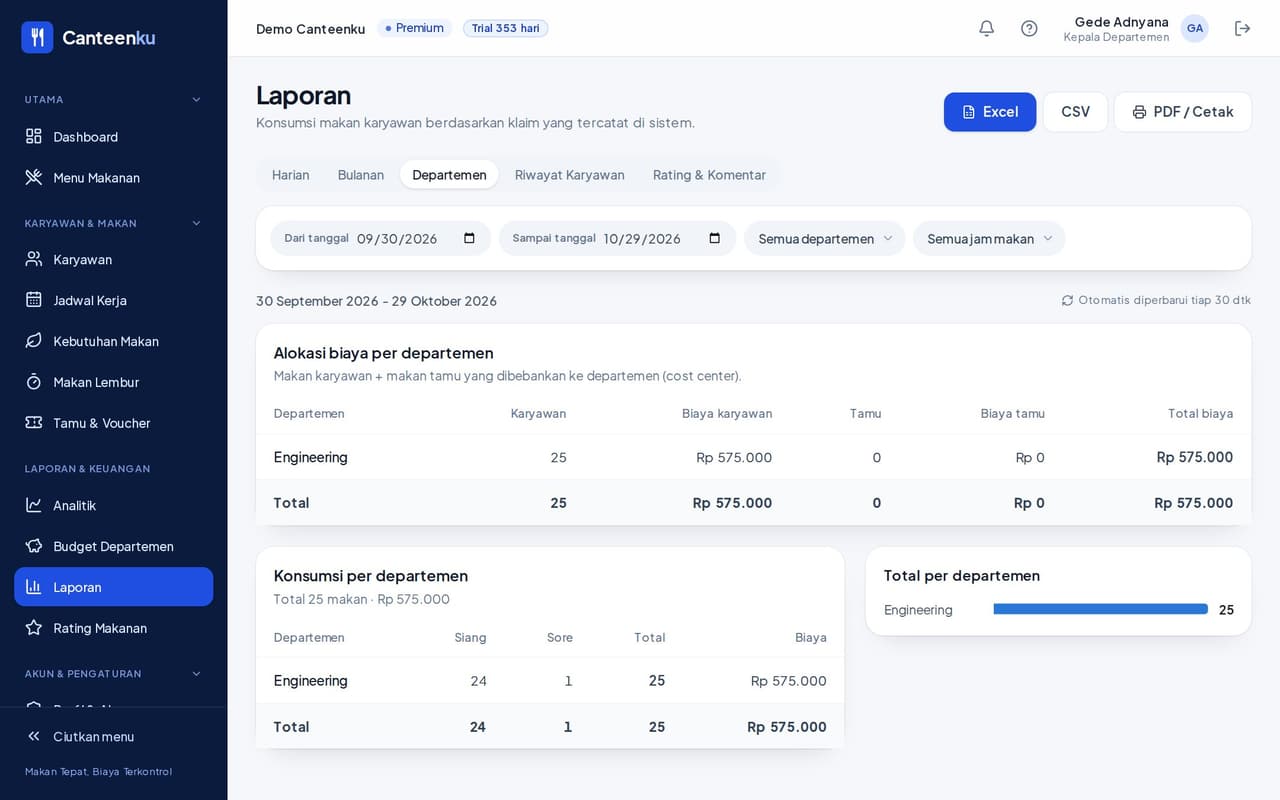
- Open Reports. Tabs: Daily, Monthly, Department, Employee History, and Ratings & Comments.
- Set From date, To date, and the meal time, then look at Cost allocation per department and Consumption per department.
- Download with the Excel, CSV, or PDF / Print buttons.
3Analytics
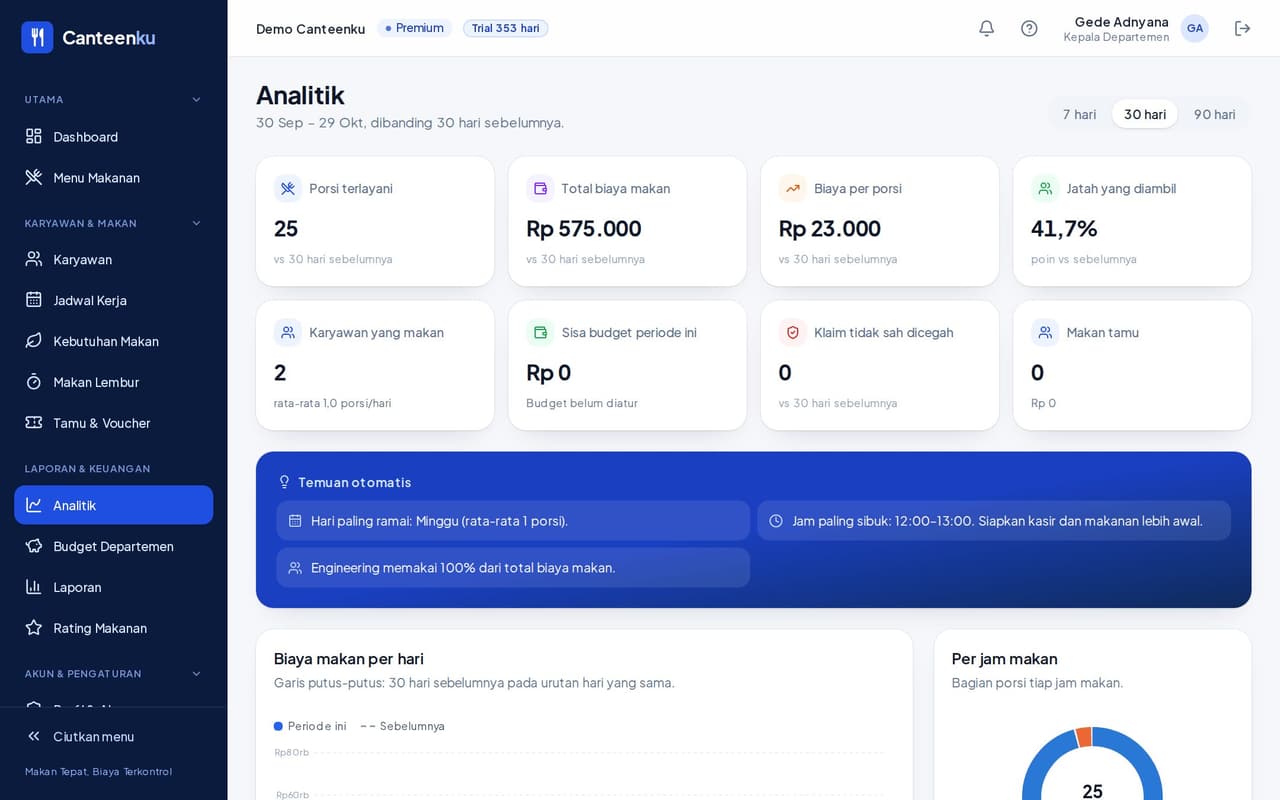
Analytics shows portions served, total meal cost, cost per portion, allowances not taken, and Automatic findings: the busiest day, the busiest hour, and the biggest portions per department. Choose a range of 7, 30, or 90 days.
Employees, dietary needs, and ratings
See your team and feedback about the food.
1Employee data
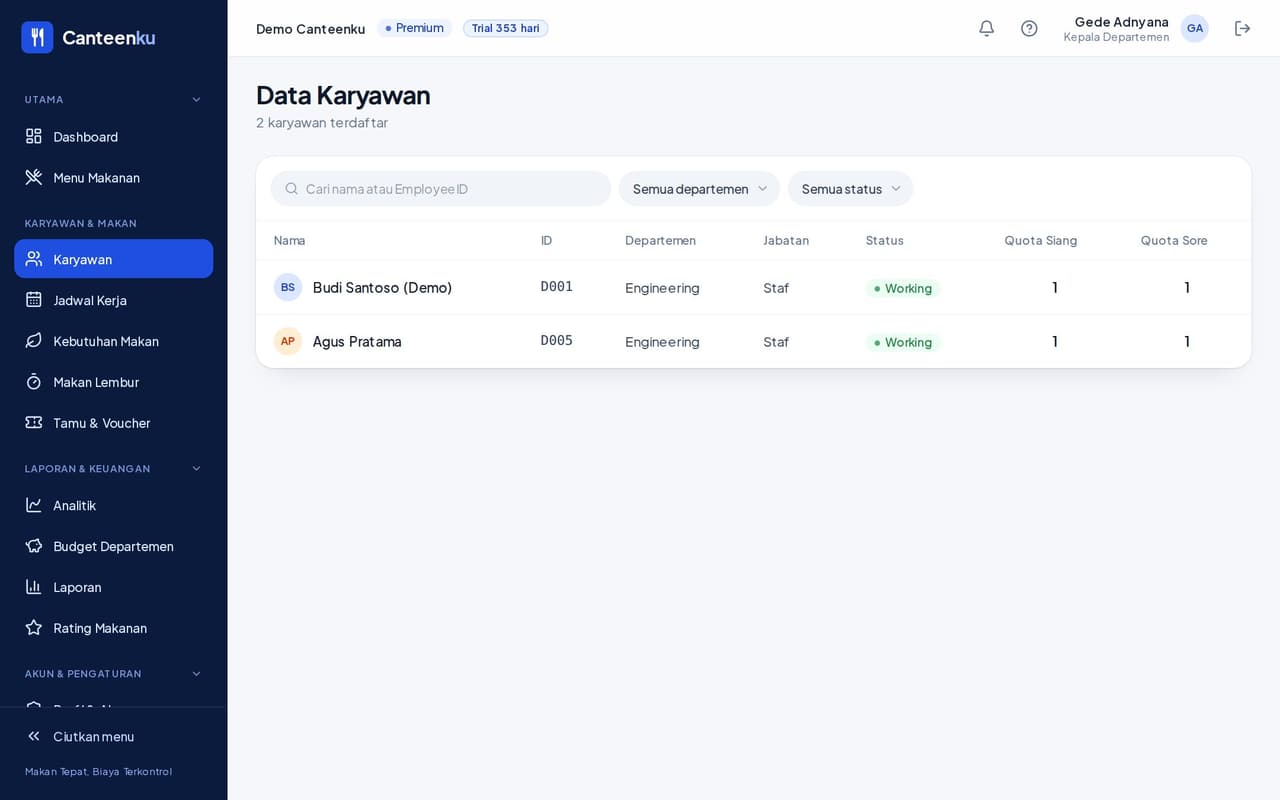
Employees shows the members of your department: name, ID, position, status, and the remaining Lunch and Dinner allowance. Use the search box (name or Employee ID) and the status filter.
2Dietary needs and ratings
- Dietary Needs: the number of vegetarian and allergic employees, without names, so the kitchen can prepare special meals.
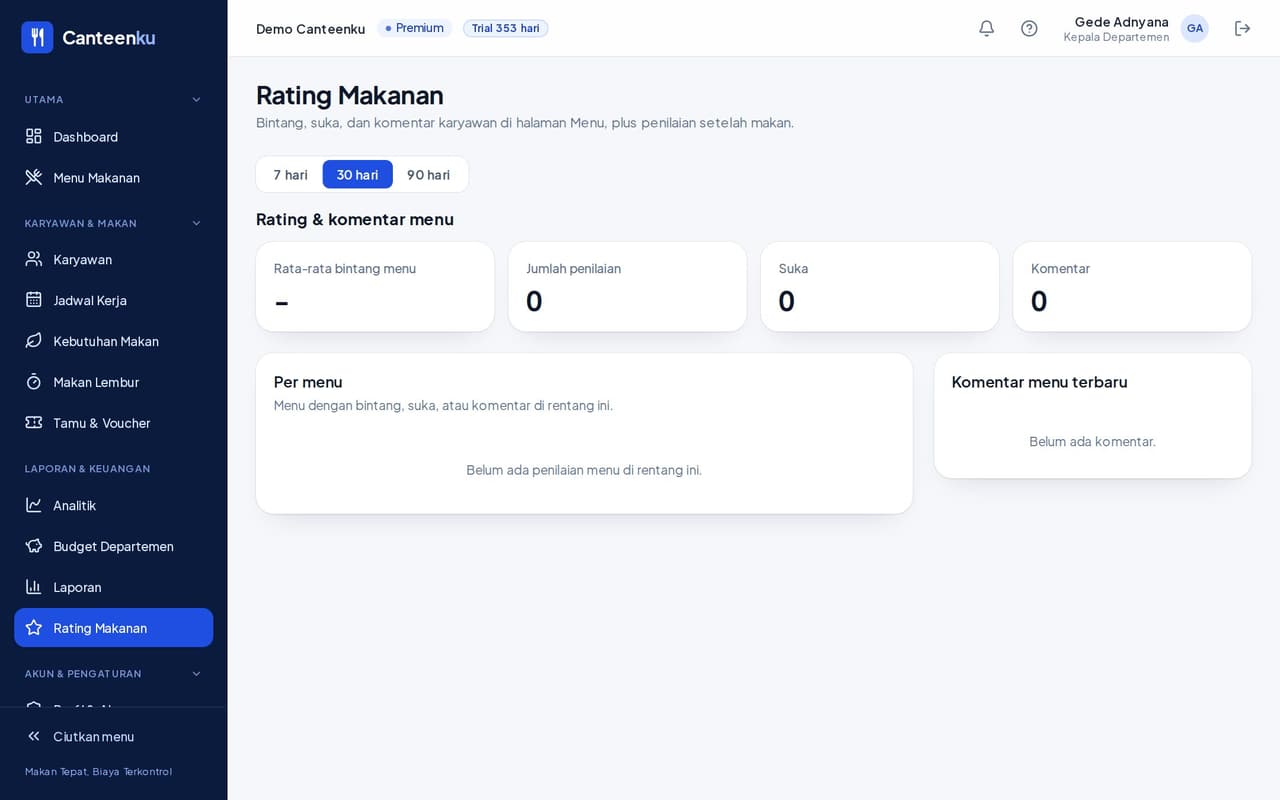
- Food Ratings: stars, likes, and employee comments. Choose a range of 7, 30, or 90 days.
- Menu: today's menu and the next few days.
Frequently asked questions
Short answers to the most common problems.
- I do not see an employee in the roster.
- The roster only shows active employees in your department. If someone is missing, ask HR to check that employee's status and department.
- An overtime request does not appear under Awaiting approval.
- Make sure notifications are on, and open the All tab. Requests only appear for employees in your department.
- A guest voucher will not scan.
- Check the validity and the allowed meal times. A voucher only works during meal times and once per meal time per day. If it is wrong, cancel it and create it again.
- My employee was refused at the canteen even though they are working.
- Check the Duty Roster: a day-off code or a status of Off or Leave makes the allowance invalid. An empty cell is fine. If the roster is correct and it is still refused, contact HR.
- The budget is over 100%. Are meals blocked?
- No. The system only sends a reminder. Employees can still eat, but the cost is recorded against your department.
Still have questions?
Contact us on WhatsApp +62 857-0779-9569 or by email at awantechsolution.bali@gmail.com. Tell us your role and the name of the menu you opened.